

The project outlined in this series was conducted on an Ardunio Portenta X8 and all device specific instructions will pertain to that device. It is possible to follow along with any device, but we will not cover specific details for anything other than the Arduino Portenta X8. Most of the content in this series is device-agnostic however, and you will be able to follow along with only small modifications.
Welcome to part 1 of our AI Powered Machine Learning Christmas Tree Series!
The goal of this series is to equip your Christmas Tree with the capability to control its own lighting. To do this, a webcam will be connected to an Arduino Portenta X8 running a ML algorithm powered by the Edge Impulse AI Platform.
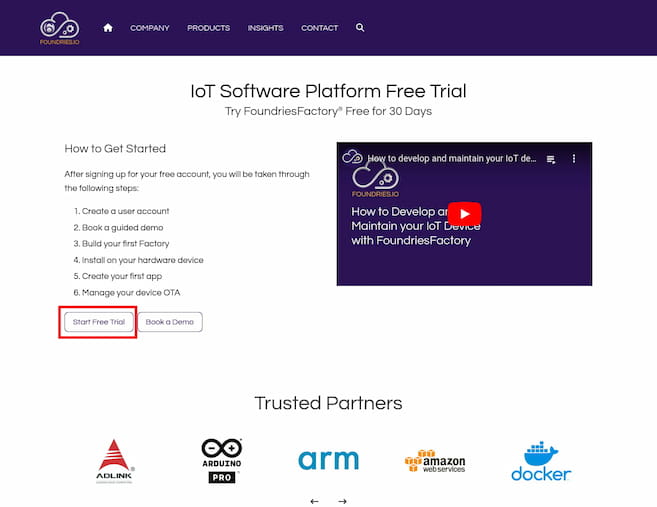
To begin, the first thing to do is to launch your own Factory.
Introducing FoundriesFactory - All-Encompassing Cloud Software Package
The FoundriesFactory® platform is an all-encompassing cloud software package which simplifies and reduces the cost of developing, deploying, and maintaining your secure IoT and Edge Linux-based devices. This page illustrates some of the core features available in FoundriesFactory.
Start Your Free Trial
To begin using FoundriesFactory, start with creating an account with us.
Signup page:
Complete sign up and create your first Factory with a unique name!
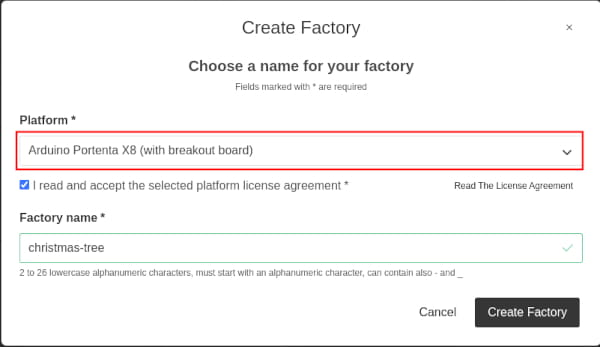
When creating your Factory, you will be presented with the above menu. The Platform dropdown box will enable you to select which platform you would like to create an image for.
Select whichever device you have available.
Name your Factory and click the Create Factory button!
You will be redirected over to app.foundries.io where you will meet the Factory Overview page:
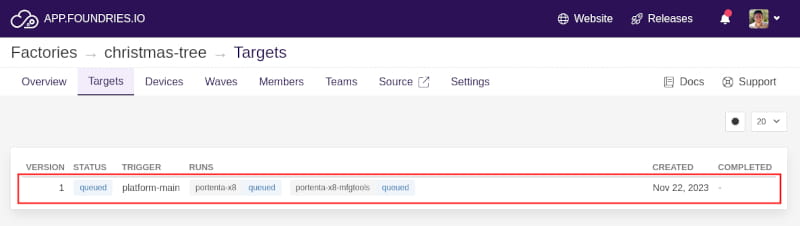
Click on the Targets tab highlighted in the image above to see your First Target being generated. The Arduino Portenta X8 is based on our Arduino’s partner image, meaning it will build the image from scratch and should take around 15 to 20 minutes.
However, most other evaluation kits use the Fast First Target, meaning no wait time!
What is a Target?
Let’s examine what exactly a FoundriesFactory Target is. A Target is a description of the software a device should run. This includes two main parts that can be updated:
- Root File System (rootfs): This is the core operating system of the device. Together with the Linux Kernel and Bootloader (OStree), which allows for atomic updates.
- Docker Compose Apps: These typically comprise additional software applications or components that are part of your Factory build. They are also included in the Target, and can be updated separately from the rootfs.
The Linux microPlatform™ (LmP) is based on the OpenEmbedded / Yocto Project, and adds a select set of board support package layers to enable popular development boards.
For more information on FoundriesFactory Targets, see our What is a Target blog post.
While you are waiting for the build to complete, this would be an excellent time to install Fioctl™. Fioctl is a tool for interacting with the Foundries.io REST API.
Flashing and Connecting to Arduino Portenta X8
After the build is complete, and you have Fioctl™ installed and configured, the next step is to flash your Arduino Portenta X8 with the Target that was just created. We have detailed instructions to do just that over on our docs page. Once the board is booted and running your first Target, it is time to connect to the board. We will log into the board via SSH, but in order to do this, we first need to connect it to the Internet.
Consulting the user manual for your particular device for the best method to do this.
Once your device is connected to your network, you will be able to log into it via SSH.
To login via SSH on your host machine, run:
ssh fio@<machine-name>.local
Where fio is the username and machine-name is the hostname of your device. The default password is fio.
By default, your device hostname is set to a unique string that specifies the platform chosen during Factory creation (machine). Check Supported Machines for a list of supported platforms and their machine values.
Once you have access to your device’s terminal, you will be able to register it to your Factory.
With all that done, you can now build and deploy our first hello-word Docker app with FoundriesFactory.
Deploying Your First Application
It’s time to harness the power of FoundriesFactory to show how easy it is to deploy an app onto your device (or thousands of devices all at once).
FoundriesFactory gives you the ability to build the Docker Image for ARM32, ARM64, and x86 in the cloud and, by using docker-compose.yml, make it available for any device connected to your Factory. Below is a diagram explaining the architecture:

Devices registered to a Factory communicate with the device gateway via the aktualizr-lite daemon. This manages all the configured applications and - based on your preferences - enables and disables them. These modifications are enabled through Fioctl and managed on the device with fioconfig.
But let's see a practical example of this in action, and deploy a hello-world application using FoundriesFactory.
Containers.git
To begin; clone your containers.git from source.foundries.io:
host:~$ git clone https://source.foundries.io/factories/<factory>/containers.git
Go ahead and enter your containers directory. If you have not made any personal modifications, it should look like this:
containers/
├── README.md
├── shellhttpd
└── shellhttpd.disabled
    ├── docker-build.conf
    ├── docker-compose.yml
    ├── Dockerfile
    └── httpd.sh
Shellhttpd is a demonstration app to illustrate containers on LmP; if you've worked with Docker before the structure should be familiar to you.
Within this directory, we are going to create a hello-world app. Create a folder named helloworld with the files below inside it:
host:~$ mkdir helloworld
host:~$ cd helloworld
host:~$ vim helloworld.c

#include <stdio.h>
#include <unistd.h>
int main()
{
    while(1)
    {
        printf("Hello World\n");
        sleep(3);
    }
    return 0;
}
host:~$ vim Dockerfile

FROM alpine:3.18
RUN apk add build-base
COPY helloworld.c .
RUN gcc helloworld.c -o helloworld
CMD ["./helloworld"]
host:~$ vim docker-compose.yml

version: '3.2'

services:
  httpd:
    image: hub.foundries.io/${FACTORY}/helloworld:latest
    stdin_open: true
    tty: true
With the files in place, commit your changes and push:
host:~$ cd .. # back to containers
host:~$ git add helloworld/
host:~$ git commit -m "Adding HelloWorld App"
host:~$ git push

Enumerating objects: 7, done.
Counting objects: 100% (7/7), done.
Delta compression using up to 16 threads
Compressing objects: 100% (6/6), done.
Writing objects: 100% (6/6), 774 bytes | 774.00 KiB/s, done.
Total 6 (delta 0), reused 0 (delta 0), pack-reused 0
remote: Trigger CI job...
remote: CI job started: https://app.foundries.io/factories/<factory>/targets/2/
To https://source.foundries.io/factories/<factory>/containers.git/
   ae2fe99..d8b67ac  main -> main
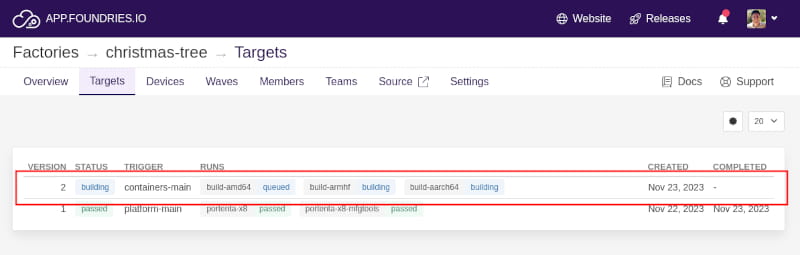
This will launch the CI build for your Factory’s containers. You may follow your build on app.foundries.io on the Target page:
If you have not already done so, now register your device to the Factory.
Using Fioctl to Configure Your Device
By default, a device will run all apps associated with the latest Target which it upgrades to. This behavior can be changed by enabling only specific applications. Read Enabling/Disabling Apps to learn how. Briefly, if you wish to enable only our helloworld app and not shellhttpd:
host:~$ fioctl devices config updates --apps helloworld <device-name> -f <factory>
Changing apps from: [] -> [helloworld]
At this time, the aktualizr-lite daemon on your device will recognize the available update and begin downloading and applying it. On your device you may follow the update logs with:
device:~$ sudo journalctl -f -u aktualizr-lite
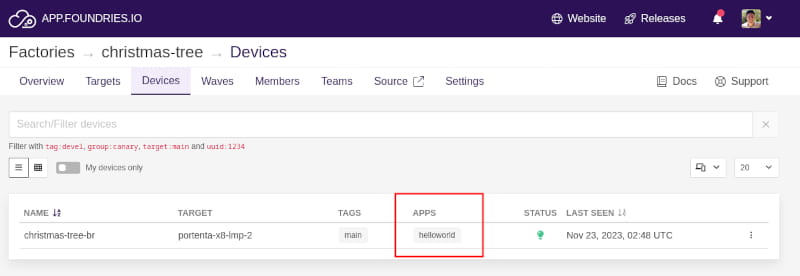
Once the update is complete, you will be able to see view the status of your device and its associated app on the Devices tab on your Factory page on app.foundries.io.
Testing HelloWorld
On your device terminal, use docker ps to find all applications running on your device:
device:~$ docker ps

CONTAINER ID   IMAGE                                 COMMAND          CREATED         STATUS         PORTS     NAMES
880811d552e3   hub.foundries.io/testv91/helloworld   "./helloworld"   3 minutes ago   Up 3 minutes             helloworld-httpd-1
Next, use Docker logs to check the hello-world output:
device:~$ docker logs helloworld-httpd-1

Hello World
Hello World
Hello World
Hello World
Hello World
Hello World
Hello World
You have now successfully built and deployed your first container application with FoundriesFactory!
Recap and Conclusion
In this tutorial, you have:
- Created your Factory and first Target
- Flashed your device and registered it to the Factory
- Installed Fioctl and setup credentials to interact with Factory repositories
- Built and deployed your first container app
Understanding these concepts should help you grasp the power of FoundriesFactory and is the first step in building your own AI powered Machine Learning Christmas Tree.
Join us for the next step in the series as we discuss network configuration.
Continue Building Ai-Powered Christmas Tree
If you are interested in our entire 14-part series on how to build an AI powdered Christmas tree, browse through each section below. Each part brings you closer to mastering your build:
- Part 1: Your First FoundriesFactory AI-Powered Christmas Tree
- Part 2: Configure Network and Wi-Fi
- Part 3: A Yocto & Linux Tutorial for Building An AI-Powered Christmas Tree
- Part 4: Linux MicroPlatform (lmP) Config Tutorial for AI-Powered Christmas Tree
- Part 5: Modify & Extend Linux MicroPlatform for AI-Powered Christmas Tree
- Part 6: Using a MQTT Switch Module on Arduino Portenta X8
- Part 7: Creating a Shell Script Application and Adding to Linux microPlatform™ (MQTT)
- Part 8: Connecting the Web Camera Interface with Docker Container
- Part 9: Using Edge Impulse AI to Recognize Human Presence With Arduino Portenta X8
- Part 10: Enhancing the Image Detection Capabilities of our AI Powered Christmas Tree
- Part 11: Writing a Python App to Turn Our Christmas Tree On/Off Using AI
- Part 12: Creating a Docker Compose App to Automatically Power Your AI Christmas Tree On/Off
- Part 13: Running Docker Compose Application on a Raspberry Pi 4 to Power Our AI Christmas Tree
- Part 14: Managing Multiple SoM Platforms in the Same Factory