

For this demonstration, the Christmas Tree is wired directly to the switch module without a plug. If you are not comfortable wiring connections, choose from any of the ready-to-use plugs which you can find on this list.
Welcome to part six of our AI Powered Christmas Tree Series! The goal of this series is to serve as a guide for you to build your own AI powered Machine Learning Christmas Tree, thanks to the Arduino Portenta X8 SoM and the Edge Impulse AI Platform.
In this tutorial, we’ll show you how to configure an MQTT switch module to connect to your device, so that you can use it to control your Christmas Tree lights. Before jumping into this entry, however, be sure to check out the previous blog entries.
You can find a summary of each tutorial and a sneak peek of what’s coming next on our project overview page.
What is a Switch Module?
A switch module is a hardware device designed to control the state of multiple switches or relays. It facilitates remote control, automation, and integration with IoT device systems. Without a switch module, turning the lights on or off on your Christmas Tree would require manual interaction with the physical switches or plugs.
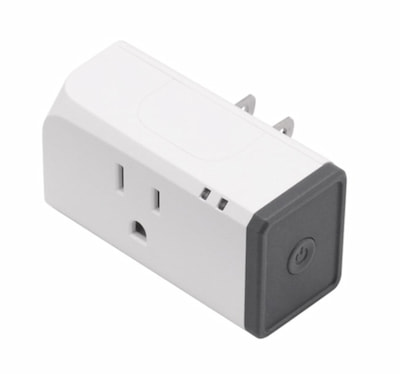
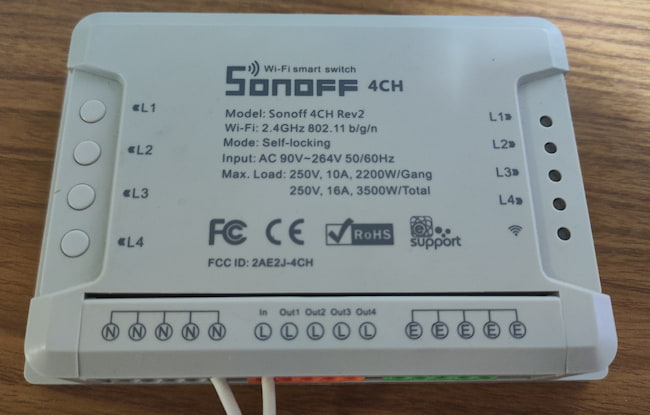
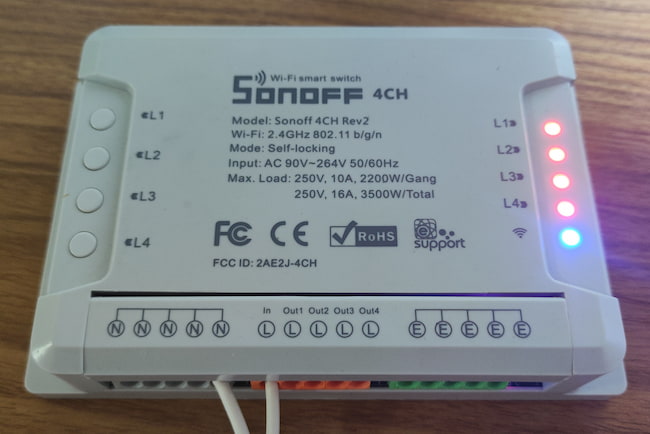
In order for the switch to communicate with your Ardunio Portenta X8 (or other chosen hardware), it needs to support MQTT (Message Queuing Telemetry Transport). There are many switch modules which have MQTT support out the box, but for our demonstration we are using a SONOFF 4CH Rev2, and have replaced its firmware with Tasmota. Tasmota is an open-source firmware for Espressif devices. You can find a list of other Tasmota switch modules in the Tasmota Supported Devices Repository.

Prerequisites
This is part six of our AI Powered Christmas Tree Series. Please ensure you’ve completed the earlier parts before continuing. You will also need:
- A switch module with MQTT support
- A Linux device with Mosquitto set up
Switch Module Setup - Generic
The following instructions will be based on the SONOFF 4CH, running Tasmota. However, most switch modules follow a similar process:
- They provide you with their own Wi-Fi network
- You join this network and access its settings page to configure the network for connecting to your home network
- The switch reboots and then connects to your network
- You access the switch to configure the MQTT Broker - we are using Mosquitto
- The switch will connect to the broker (running on our Ardunio Portenta X8)
- You send commands from the Ardunio Portenta X8 to the switch, to turn on/off the relay
Connecting Switch to the Wi-Fi Network - SONOFF 4CH - TASMOTA
When you turn on the switch, it provides its own Wi-Fi network with no password.
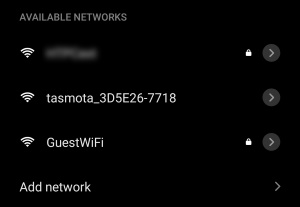
Join the network to configure the switch to join your home network. Do this by either selecting your network from the list or inputting its name manually in the WiFi Network field. Then input your network's password:
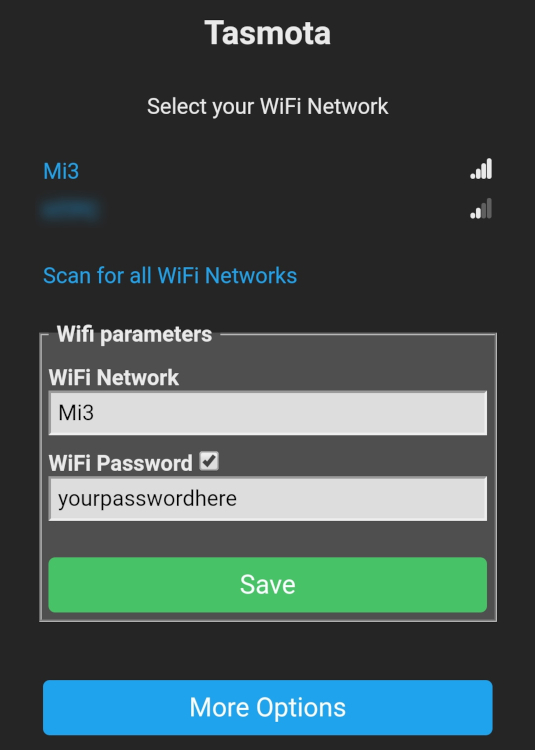
Click Save then wait for the switch to join your network. For the next step, you will need the IP address of both your Arduino Portenta X8 (or other embedded Linux Device), and your switch module. If you don't know their IP addresses, you can check your router for connected devices.
Connect the Module on the Linux MQTT Broker
To configure your switch to connect to the MQTT broker, you will need to return to the switch configuration WebUI. Access this by inputting your switch's IP address in your favorite web browser. Once there, go to Configuration -> Configure Other and make sure MQTT Enable box is checked. You will then see the configuration menu:
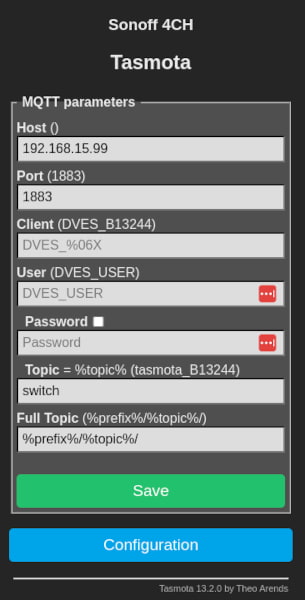
- Under Host input the IP address of your Arduino Portenta X8 or other embedded Linux Device
- Set port
1883, the default - Leave the Client, User & Password fields empty
- Under Topic put
switch
Save, and then wait for the device to connect to your Ardunio Portenta X8 or other embedded Linux Device.
Sending MQTT Commands to the Switch Module
Now we will log in to our Arduino Portenta X8 (or other embedded Linux Device) and use mosquitto_pub to send commands to the switch module.
Commands sent over MQTT to device running Tasmota are issued by using topic cmnd/%topic%/<command>. You can read more about issuing commands in their documentation.
With our current configuration, the topic is cmnd/switch/POWER1, cmnd/switch/POWER2, cmnd/switch/POWER3 and cmnd/switch/POWER4.
On the Embedded Linux device terminal, to turn on output 1 run:
device:~$ mosquitto_pub -h 192.168.15.99 -t cmnd/switch/POWER1 -m "ON"
Let’s break down this command:
mosquitto_pub: This is the command-line tool for publishing messages using the MQTT protocol. It is part of the Mosquitto MQTT broker package.-h 192.168.15.99: The-hflag is used to specify the hostname or IP address of the MQTT broker. In this case, the broker is located at IP address192.168.15.99.-t cmnd/switch/POWER1: The-tflag is used to specify the MQTT topic to which the message will be published. Here, the topic is set tocmnd/switch/POWER1.-m "ON": The-mflag is used to specify the message payload. In this case, the message is set to"ON". This indicates that the action being requested is to turn on the corresponding switch.
We can repeat similar commands to power on the other outputs.
Power on output 2:
device:~$ mosquitto_pub -h 192.168.15.99 -t cmnd/switch/POWER2 -m "ON"
Power on output 3:
device:~$ mosquitto_pub -h 192.168.15.99 -t cmnd/switch/POWER3 -m "ON"
Power on output 4:
device:~$ mosquitto_pub -h 192.168.15.99 -t cmnd/switch/POWER4 -m "ON"
Finally, to turn them all off we change the -m payload to "OFF":
device:~$ mosquitto_pub -h 192.168.15.99 -t cmnd/switch/POWER1 -m "OFF"
device:~$ mosquitto_pub -h 192.168.15.99 -t cmnd/switch/POWER2 -m "OFF"
device:~$ mosquitto_pub -h 192.168.15.99 -t cmnd/switch/POWER3 -m "OFF"
device:~$ mosquitto_pub -h 192.168.15.99 -t cmnd/switch/POWER4 -m "OFF"
MQTT Switch Module Protocol Recap and Conclusion
In this tutorial, we covered configuring an MQTT switch Module on an Arduino Portenta X8 SoM to connect to our MQTT broker running on our embedded Linux device. This is so that we may use it to power on/off outputs to control the lights on our Christmas Tree.
Continue Building Ai-Powered Christmas Tree
If you are interested in our entire 14-part series on how to build an AI powdered Christmas tree, browse through each section below. Each part brings you closer to mastering your build:
- Part 1: Your First FoundriesFactory AI-Powered Christmas Tree
- Part 2: Configure Network and Wi-Fi
- Part 3: A Yocto & Linux Tutorial for Building An AI-Powered Christmas Tree
- Part 4: Linux MicroPlatform (lmP) Config Tutorial for AI-Powered Christmas Tree
- Part 5: Modify & Extend Linux MicroPlatform for AI-Powered Christmas Tree
- Part 6: Using a MQTT Switch Module on Arduino Portenta X8
- Part 7: Creating a Shell Script Application and Adding to Linux microPlatform™ (MQTT)
- Part 8: Connecting the Web Camera Interface with Docker Container
- Part 9: Using Edge Impulse AI to Recognize Human Presence With Arduino Portenta X8
- Part 10: Enhancing the Image Detection Capabilities of our AI Powered Christmas Tree
- Part 11: Writing a Python App to Turn Our Christmas Tree On/Off Using AI
- Part 12: Creating a Docker Compose App to Automatically Power Your AI Christmas Tree On/Off
- Part 13: Running Docker Compose Application on a Raspberry Pi 4 to Power Our AI Christmas Tree
- Part 14: Managing Multiple SoM Platforms in the Same Factory