

Welcome to part seven of our AI Powered Christmas Tree Series! The goal of this series is to serve as a guide for you to build your own AI powered Machine Learning Christmas Tree, thanks to the Arduino Portenta X8 SoM and Edge Impulse AI Platform.
In this tutorial, we will be writing a simple shell script to send MQTT messages to our switch module to turn power on/off for each of its outputs. Before jumping into this entry, be sure to check out the previous blog entries. You can find a summary of each tutorial and a sneak peek of what’s coming next on our project overview page.
Introduction
You'll be crafting two simple applications: one which runs just once when the system boots and turns off all the switch module outputs, and the second will be continually reading the switch module status and writing the output state into a file. You will then integrate both of these into your Linux microPlatform™ (LmP) image, so every device that installs your LmP will have these applications available.
Prerequisites
This is part seven of our AI Powered Christmas Tree Series. Please ensure you’ve completed the earlier parts before continuing.
You will also need:
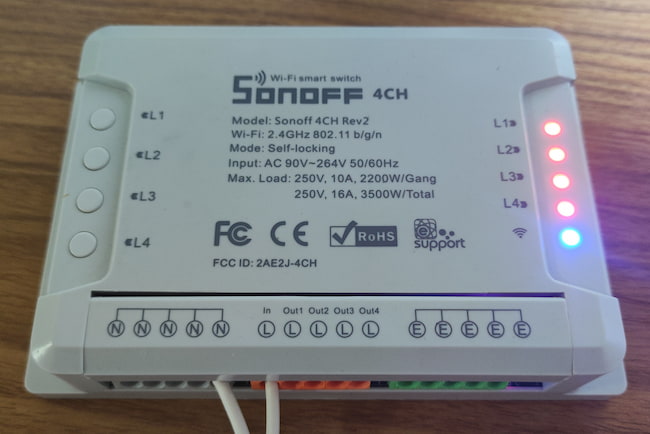
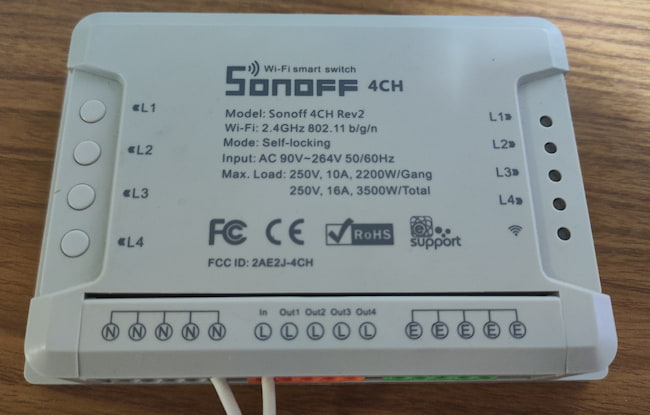
- A Switch Module connected over MQTT
Development and Testing Shell Scripts - Cleaning All Outputs
To begin, you’ll need to create your test scripts on the Arduino Portenta X8 (or other embedded Linux device) to ensure that they work as expected.
On your device, copy the following shell script with the name switch-clear.sh:
device:~$ vim switch-clear.sh

#!/bin/sh
mosquitto_pub -t cmnd/switch/POWER1 -m "OFF"
mosquitto_pub -t cmnd/switch/POWER2 -m "OFF"
mosquitto_pub -t cmnd/switch/POWER3 -m "OFF"
mosquitto_pub -t cmnd/switch/POWER4 -m "OFF"
The purpose of this script is just to turn off all relays.
Run the app and test by manually pressing the power on buttons on the switch:
Run the script:
device:~$ chmod +x switch-clear.sh
device:~$ ./switch-clear.sh
It should turn all the power outlets off again. Which is perfect!
Development and Testing Shell Scripts - Reading Output State
This second script will continuously read the state of the outputs and save it to a file. The goal is to eventually convert this to a system service that monitors the outputs and saves the information on the file system in case you need to know the state.
For now, you’ll only make a simple script to do this job. Again, on your embedded Linux device, create a script and name it switch-status.sh:
device:~$ vim switch-status.sh

#!/bin/sh
file=/var/rootdirs/home/fio/status.txt
while true
do
    mosquitto_sub -h localhost -t stat/switch/RESULT -F "%p" | while read -r payload
    do
        echo "payload: $payload"
        case $payload in
            *"POWER1"*)
                echo "POWER1"
                sed -i '/POWER1/d' $file
                ;;
            *"POWER2"*)
                echo "POWER2"
                sed -i '/POWER2/d' $file
                ;;
            *"POWER3"*)
                echo "POWER3"
                sed -i '/POWER3/d' $file
                ;;
            *"POWER4"*)
                echo "POWER4"
                sed -i '/POWER4/d' $file
                ;;
            *)
                echo "INVALID FILE";;
        esac
        echo $payload >> $file
    done
    sleep 1
done # &
This script is a little more complex than the previous one, so let’s break it down a little.
file=/var/rootdirs/home/fio/status.txt
This is the file where you will write the output state.
The while true statement creates an infinite loop, which will keep your script running until you manually interrupt it.
mosquitto_sub -h localhost -t stat/switch/RESULT -F "%p" | while read -r payload
This line subscribes to the MQTT topic stat/switch/RESULT using the mosquitto_sub command from mosquitto-tools package, and captures the payload of received messages. The -F "%p" option formats the output to only display the payload. In this case, the payload is the content of the message received from the MQTT topic stat/switch/RESULT.
    do
	    echo "payload: $payload"
Open an inner while loop to read and process the MQTT messages. The echo statement prints the received payload to the console for debugging purposes.
case $payload in
    *"POWER1"*)
        echo "POWER1"
        sed -i '/POWER1/d' $file
        ;;
     *"POWER2"*)
        echo "POWER2"
        sed -i '/POWER2/d' $file
        ;;
     *"POWER3"*)
        echo "POWER3"
        sed -i '/POWER3/d' $file
        ;;
      *"POWER4"*)
        echo "POWER4"
        sed -i '/POWER4/d' $file
        ;;
The case statement first checks if the payload is equal to the string POWER1, POWER2, POWER3 and POWER4. If that condition is true, the following case removes the line with the corresponding POWERX from the file.
echo $payload >> $file
Finally, at the end of the case, we update the file with the new payload information.
Now verify that the script is working. Open a terminal (Terminal 1) and run the newly created script — switch-status.sh. Leave it running and open a new terminal (Terminal 2).
Terminal 1:
device:~$ chmod +x switch-status.sh
device:~$ ./switch-status.sh
On Terminal 2 turn on the Switch Module Output 1.
device:~$ mosquitto_pub -t cmnd/switch/POWER1 -m "ON"
Check the file:
device:~$ cat /var/rootdirs/home/fio/status.txt

{"POWER1":"ON"}
Toggle the different outputs and check the state:
device:~$ mosquitto_pub -t cmnd/switch/POWER1 -m "ON"
device:~$ mosquitto_pub -t cmnd/switch/POWER2 -m "OFF"
device:~$ mosquitto_pub -t cmnd/switch/POWER3 -m "ON"
device:~$ mosquitto_pub -t cmnd/switch/POWER4 -m "OFF"
Check the file to verify the content:
device:~$ cat /var/rootdirs/home/fio/status.txt

{"POWER1":"ON"}
{"POWER2":"OFF"}
{"POWER3":"ON"}
{"POWER4":"OFF"}
The script is doing everything we need it to do, and it’s now time to create a more permanent version.
FoundriesFactory Linux microPlatform Instructions
Now that you have successfully built and tested our scripts, it is time to include them in your LmP so that they are available on any device running your image. To do this we first need to build the recipe, so it can be added to our image.
Begin by entering your meta-subscriber-overrides.git:
host:~$ cd meta-subscriber-overrides/
Create Switch-Clear Recipe
Unlike previous tutorials where we modified an existing recipe, or added recipes already available in our layer, this time we are creating a whole new recipe from scratch.
To quickly recap, recipes are essentially a set of instructions which tell the OpenEmbedded build system how to build a package. That means our recipe must contain instructions on where to source the files for our application, any dependencies, and how to configure, compile, and install it in our final image.
Create a folder in meta-subscriber-overrides/ using the following structure:
host:~$ mkdir -p recipes-support/switch-clear/switch-clear/
Now create the recipe file for switch-clear. We will also need to create a system service to start the application:
host:~$ vim recipes-support/switch-clear/switch-clear_0.1.bb
There is an example recipe template from our documentation on Extending the Linux microPlatform which you may wish to read, to better understand the components of this file.
Below is the exact recipe file for switch-clear.
SUMMARY = "Switch Clear"
SECTION = "devel"
LICENSE = "BSD-2-Clause"
LIC_FILES_CHKSUM = "file://${COMMON_LICENSE_DIR}/BSD-2-Clause;md5=cb641bc04cda31daea161b1bc15da69f"

inherit allarch systemd

RDEPENDS:${PN} += "mosquitto mosquitto-clients"

SRC_URI = " file://switch-clear.sh \
            file://switch-clear.service \
"

S = "${WORKDIR}"

PACKAGE_ARCH = "${MACHINE_ARCH}"

do_install () {
	install -d ${D}${sbindir}
	install -m 0755 ${S}/switch-clear.sh ${D}${sbindir}
	install -d ${D}${systemd_system_unitdir}
	install -m 0644 ${S}/switch-clear.service ${D}${systemd_system_unitdir}
}

SYSTEMD_SERVICE:${PN} = "switch-clear.service"
SYSTEMD_AUTO_ENABLE:${PN} = "enable"
There are still two components outlined in the recipe, which you have yet to create. So let’s go ahead and do that now. Create switch-clear.sh in the following location:
host:~$ vim recipes-support/switch-clear/switch-clear/switch-clear.sh
The script is the same as the one we made earlier on the device:
#!/bin/sh
mosquitto_pub -t cmnd/switch/POWER1 -m "OFF"
mosquitto_pub -t cmnd/switch/POWER2 -m "OFF"
mosquitto_pub -t cmnd/switch/POWER3 -m "OFF"
mosquitto_pub -t cmnd/switch/POWER4 -m "OFF"
Finally, create the system service file in this location:
host:~$ vim recipes-support/switch-clear/switch-clear/switch-clear.service
This file configures how the system manages and starts our application. Copy and paste the following into the file:
[Unit]
Description=Switch Clear
DefaultDependencies=no
After=systemd-udev-settle.service
Before=sysinit.target shutdown.target
Conflicts=shutdown.target
Description=Start up Application

[Service]
ExecStart=/usr/sbin/switch-clear.sh
RemainAfterExit=false

[Install]
WantedBy=sysinit.target
With that completed, we have successfully created our first recipe! But it’s only part of our application, we still need to create the recipe for switch-status.
Luckily, it is largely the same process.
Create switch-status Recipe
Create another folder in your meta-subscriber-overrides/ using the following structure:
host:~$ mkdir -p recipes-support/switch-status/switch-status/
Create the recipe file that installs switch-status.sh, and the system service that starts the application:
host:~$ vim recipes-support/switch-status/switch-status_0.1.bb
Copy and paste the following content to the file:
SUMMARY = "Switch Status"
SECTION = "devel"
LICENSE = "BSD-2-Clause"
LIC_FILES_CHKSUM = "file://${COMMON_LICENSE_DIR}/BSD-2-Clause;md5=cb641bc04cda31daea161b1bc15da69f"

inherit allarch systemd

RDEPENDS:${PN} += "mosquitto mosquitto-clients"

SRC_URI = " file://switch-status.sh \
            file://switch-status.service \
"

S = "${WORKDIR}"

PACKAGE_ARCH = "${MACHINE_ARCH}"

do_install () {
	install -d ${D}${sbindir}
	install -m 0755 ${S}/switch-status.sh ${D}${sbindir}

	install -d ${D}${systemd_system_unitdir}
	install -m 0644 ${S}/switch-status.service ${D}${systemd_system_unitdir}
}

SYSTEMD_SERVICE:${PN} = "switch-status.service"
SYSTEMD_AUTO_ENABLE:${PN} = "enable"
Same as before, you need to recreate the same switch-status.sh script that we did on the device:
host:~$ vim recipes-support/switch-status/switch-status/switch-status.sh

#!/bin/sh
file=/var/rootdirs/home/fio/status.txt
while true
do
    mosquitto_sub -h localhost -t stat/switch/RESULT -F "%p" | while read -r payload
    do
        echo "payload: $payload"
        case $payload in
            *"POWER1"*)
                echo "POWER1"
                sed -i '/POWER1/d' $file
                ;;
            *"POWER2"*)
                echo "POWER2"
                sed -i '/POWER2/d' $file
                ;;
            *"POWER3"*)
                echo "POWER3"
                sed -i '/POWER3/d' $file
                ;;
            *"POWER4"*)
                echo "POWER4"
                sed -i '/POWER4/d' $file
                ;;
            *)
                echo "INVALID FILE";;
        esac
        echo $payload >> $file
    done
    sleep 1
done # &
Finally, create the system service:
host:~$ vim recipes-support/switch-status/switch-status/switch-status.service

[Unit]
Description=Switch Status
DefaultDependencies=no
After=systemd-udev-settle.service
Before=sysinit.target shutdown.target
Conflicts=shutdown.target
Description=Start up Application

[Service]
ExecStart=/usr/sbin/switch-status.sh
RemainAfterExit=true

[Install]
WantedBy=sysinit.target
Adding New Shell Apps to the LmP
Now that you have the recipes, the next step is to add them to your LmP Image. To do this you need to edit lmp-factory-image.bb, or in case of the Arduino Portenta x8, we edit lmp-partner-arduino-image.bbappend. Open the file and add app-read and switch-status to the CORE_IMAGE_BASE_INSTALL list:
Most Embedded Linux devices
host:~$ vim recipes-samples/images/lmp-factory-image.bb
The end result should look this:
CORE_IMAGE_BASE_INSTALL += " \
    switch-clear \
    switch-status \
    mosquitto \
    mosquitto-clients \
    libgpiod \
    libgpiod-tools \
    kernel-modules \
    networkmanager-nmcli \
    git \
    vim \
    packagegroup-core-full-cmdline-extended \
    ${@bb.utils.contains('LMP_DISABLE_GPLV3', '1', '', '${CORE_IMAGE_BASE_INSTALL_GPLV3}', d)} \
"
Arduino Portenta X8
host:~$ vim recipes-samples/images/lmp-partner-arduino-image.bbappend
The end result should look this:
CORE_IMAGE_BASE_INSTALL += " \
    switch-clear \
    switch-status \
    mosquitto \
    mosquitto-clients \
"
Pushing the Changes
Add the files, commit your changes, and push:
host:~$ git add recipes-support/*
host:~$ git add recipes-samples/images/lmp-*
host:~$ git commit -m "Adding switch-clear and switch-status"
host:~$ git push

Enumerating objects: 9, done.
Counting objects: 100% (9/9), done.
Delta compression using up to 16 threads
Compressing objects: 100% (3/3), done.
Writing objects: 100% (5/5), 420 bytes | 420.00 KiB/s, done.
Total 5 (delta 2), reused 0 (delta 0), pack-reused 0
remote: Trigger CI job...
remote: CI job started: https://app.foundries.io/factories/<factory>/targets/4/
To https://source.foundries.io/factories/<factory>/meta-subscriber-overrides.git/
   eb44f39..160617e  main -> main
Follow your build at app.foundries.io, on the Target page:
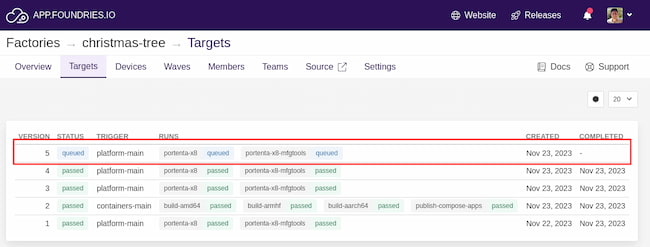
If you have followed the Registering Your Device documentation, your device is already registered to your Factory. By default, registered devices will always update to the latest Target. This behavior can be changed depending on your configuration.
When the job successfully concludes, it will automatically update your device and reboot it.
After rebooting, log on to your device and check if the switch-clear services are running, with the command systemctl status switch-clear:
device:~$ systemctl status switch-clear
● app-read.service - Start up Application
     Loaded: loaded (/usr/lib/systemd/system/app-read.service; enabled; vendor preset: enabled)
     Active: active (running) since Thu 2022-04-28 17:42:26 UTC; 1 year 6 months ago
   Main PID: 424 (app-read.sh)
      Tasks: 2 (limit: 4154)
     Memory: 1.3M
     CGroup: /system.slice/app-read.service
             ├─  424 /bin/sh /usr/sbin/app-read.sh
             └─ 6838 sleep 0.1
Do the same for the switch-status service with systemctl status switch-status:
device:~$ systemctl status switch-status
● switch-status.service - Start up Application
     Loaded: loaded (/usr/lib/systemd/system/switch-status.service; enabled; vendor preset: enabled)
     Active: active (running) since Thu 2022-04-28 17:42:26 UTC; 1 year 6 months ago
   Main PID: 423 (switch-status.sh)
      Tasks: 3 (limit: 4154)
     Memory: 3.0M
     CGroup: /system.slice/switch-status.service
             ├─ 423 /bin/sh /usr/sbin/switch-status.sh
             ├─ 727 mosquitto_sub -h localhost -t gpio22 -F %p
             └─ 728 /bin/sh /usr/sbin/switch-status.sh
You can also check if the bash scripts are running with the following command:
device:~$ ps aux | grep app-

root         423  0.0  0.0   3792  2640 ?        Ss   02:34   0:00 /bin/sh /usr/sbin/switch-status.sh
And finally, we can look at the logs for switch-status to check the debug output we included in the script by pressing the switch:
device:~$ journalctl -f -u switch-status

Oct 31 02:40:02 raspberrypi4-64 switch-status.sh[728]: payload: pressed
Oct 31 02:40:04 raspberrypi4-64 switch-status.sh[728]: payload: pressed
Oct 31 02:40:05 raspberrypi4-64 switch-status.sh[728]: payload: pressed
Recap and Conclusion
By following this tutorial, you wrote and tested two shell scripts to send MQTT messages to our switch module. One to power off all the outlets, and the second to continually monitor the status of each outlet and record any changes to a file.
We then added these scripts as new recipes to our LmP Image, and created a system service to enable them. With these services in place, you will be able to log the switch status and debug any issues you may have later… and cut all power to the switches outlets — which you can use to turn our Christmas Tree’s lights off!
Continue Building Ai-Powered Christmas Tree
If you are interested in our entire 14-part series on how to build an AI powdered Christmas tree, browse through each section below. Each part brings you closer to mastering your build:
- Part 1: Your First FoundriesFactory AI-Powered Christmas Tree
- Part 2: Configure Network and Wi-Fi
- Part 3: A Yocto & Linux Tutorial for Building An AI-Powered Christmas Tree
- Part 4: Linux MicroPlatform (lmP) Config Tutorial for AI-Powered Christmas Tree
- Part 5: Modify & Extend Linux MicroPlatform for AI-Powered Christmas Tree
- Part 6: Using a MQTT Switch Module on Arduino Portenta X8
- Part 7: Creating a Shell Script Application and Adding to Linux microPlatform™ (MQTT)
- Part 8: Connecting the Web Camera Interface with Docker Container
- Part 9: Using Edge Impulse AI to Recognize Human Presence With Arduino Portenta X8
- Part 10: Enhancing the Image Detection Capabilities of our AI Powered Christmas Tree
- Part 11: Writing a Python App to Turn Our Christmas Tree On/Off Using AI
- Part 12: Creating a Docker Compose App to Automatically Power Your AI Christmas Tree On/Off
- Part 13: Running Docker Compose Application on a Raspberry Pi 4 to Power Our AI Christmas Tree
- Part 14: Managing Multiple SoM Platforms in the Same Factory