
The process of building LmP locally is simple, however the build time will be long and consume a lot of compute cycles on the build machine.
Welcome to part three of our AI Powered Christmas Tree Series! The goal of this series is to serve as a guide for you to build your own AI powered Machine Learning Christmas Tree, thanks to the Arduino Portenta X8 SoM and Edge Impulse AI Platform.
In this tutorial, we will be exploring the basic principles of the Yocto Project and the Linux microPlatform, but before jumping into this entry, be sure to check out the previous entries: Your First FoundriesFactory AI-Powered Christmas Tree & Configuring Network and Wi-Fi.
Introduction to The Yocto Project
The Yocto Project is a collaborative open-source project which provides templates, tools, and methods to help create custom Linux-based systems for embedded and IoT devices. The project aims to simplify the process of building and maintaining custom Linux® distributions for embedded systems, ensuring that developers have control over the software and configurations, tailored to the specific requirements of their devices.
Foundries.io and its customers use the Yocto Project’s tools, concepts, and principles to build the Linux microPlatform. The Linux microPlatform (LmP) is an extensible, open-source embedded Linux distribution that aims to further simplify utilizing Yocto-based distributions.
The FoundriesFactory cloud service enables our customers to use our development technologies to streamline product development. Coupled with the LmP, they enjoy a host of hardware and software support including:
- Latest Yocto Project changes
- Optimized distribution
- Read-only file system
- Security best practices
- Incremental/Atomic Over-the-Air (OTA) updates using OStree
- CI/CD cloud-based platform to run Yocto and container builds, with caching for accelerated builds
- Device Management
- Docker Container Support
Discover many more benefits at foundries.io.
Prerequisites
This is the third entry in our AI Powered Christmas Tree Series. Please ensure you’ve completed the first two parts before continuing.
You will also need a Linux computer if you want to run a Yocto build locally.
Building the LmP
There are two ways of building the LmP with the Yocto Project:
- Building in the cloud with FoundriesFactory
- Using your computer to build locally, without FoundriesFactory.
When choosing which method to pursue, there are a few things to consider.
Over-the-Air Updates
Building with FoundriesFactory (n1) enables security and OSTree-based incremental Over-the-Air updates for your devices. This is significantly faster and easier than building locally, but requires internet connectivity. Conversely, local builds (n2) cannot utilize FoundriesFactory for Over-the-Air updates, meaning devices will have to be flashed manually.
Resources
Building locally (n2) consumes a lot of computer resources. This can slow down your computer during the long build hours. However, using FoundriesFactory (n1) frees these resources, as our cloud-based systems can produce a new build in about 15 minutes! You can develop it anywhere, from any computer, so long as you have Git.
Advanced Development Strategy
Depending on your customization level, it may be easier to build locally (n2) in order to have full control of all layers and recipes. Then, as you continue to iterate and test, move your local build to FoundriesFactory to create a reproducible release of your customized LmP.
Building with FoundriesFactory
Building the LmP with FoundriesFactory is easy. After creating your Factory you will receive a couple of relevant private repositories.
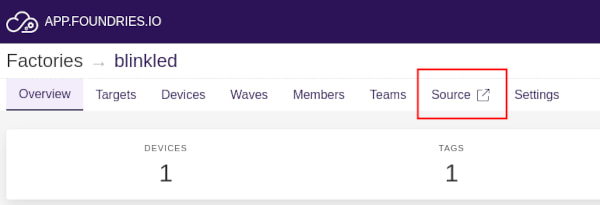

lmp-manifest.git
The lmp-manifest.git repository contains the Yocto Project manifest and the configuration files used to build your own extended Linux microPlatform. Within lmp-manifest/, there are .xml files in that specify all repositories used to create your distribution. lmp-manifest is also where you can identify your LmP version, and any extra layers that you have added.
meta-subscriber-overrides.git
The meta-subscriber-overrides.git repository has high priority in the build process. It allows you to override any default Linux microPlatform configuration, as well as add new packages to your extension of the Linux microPlatform. When building a Yocto Project based distro with FoundriesFactory (n1), the meta-subscriber-overrides.git repository is the best way to customize your distribution.
Building Locally
During development, it can sometimes be necessary to build the Linux microPlatform locally. This is typical if you wish to exert complete control over how every aspect of your build is configured before handing over to our cloud systems for a more reproducible mass market build.
We will cover the exact process in more detail shortly, but briefly, to produce a local build you will need:
- A Linux Machine
- All prerequisite software installed
- Various repositories listed in
lmp-manifest.git, installed via repo - Some specific configurations to the build command to start the build
Fetching Manifest Content for Your Local Build
Before we begin, make sure you have repo installed on your computer, and that you have already configured Fioctl, which will give you access to the lmp-manifest.
Create a folder and enter it:
host:~$ mkdir lmp && cd lmp
Use repo with your Factory name to initialize and download everything:
host:~$ repo init -u https://source.foundries.io/factories/<factory-name>/lmp-manifest.git -b <branch> -m <factory-name>.xml
host:~$ repo sync
After synchronizing, you can find the following files inside lmp/:
host:~$ ls

bitbake  layers  setup-environment  tools
Take a look inside the layers/ folder:
layers/
├── meta-arm
├── meta-clang
├── meta-flutter
├── meta-freescale
├── meta-freescale-3rdparty
├── meta-intel
├── meta-lmp
├── meta-lts-mixins-go
├── meta-lts-mixins-rust
├── meta-openembedded
├── meta-raspberrypi
├── meta-security
├── meta-st-stm32mp
├── meta-subscriber-overrides
├── meta-tegra
├── meta-ti
├── meta-updater
├── meta-virtualization
├── meta-wayland
├── meta-xilinx
├── meta-xilinx-tools
├── meta-yocto
└── openembedded-core
As you can see, layers contain all the repositories used to build your Linux microPlatform.
What is a Layer?
A layer is a collection of related recipes. Layers allow you to consolidate related metadata to customize your build. They also isolate information used when building for multiple architectures. Layers are hierarchical in their ability to override previous specifications. You can include any number of available layers from the Yocto Project, and customize the build by adding your layers after them. You can search the Layer Index for layers used within the Yocto Project.
What is a Recipe?
A recipe is the most common form of metadata. It is always inside a layer, and contains a list of settings and tasks (i.e. instructions) for building packages that are then used to build the binary image. A recipe describes where you get source code and which patches to apply. Recipes describe dependencies for libraries or for other recipes, as well as configuration and compilation options. Related recipes are consolidated into a layer.
Reference: Yocto Project Overview and Concepts Manual
Looking inside meta-intel, it is possible to see .bb files. These are the recipes:
host:~$ tree -L 3 layers/meta-intel/
layers/meta-intel/
├── classes
│   ├── uefi-comboapp.bbclass
│   └── uefi-sign.bbclass
├── conf
│   ├── layer.conf
│   └── machine
│       ├── include
│       └── intel-skylake-64.conf
├── recipes-bsp
│   └── formfactor
│       ├── formfactor
│       └── formfactor_0.0.bbappend
└── recipes-kernel
    ├── intel-ethernet
    │   ├── ixgbe_5.15.2.bb
    │   └── ixgbevf_4.15.1.bb
    ├── iwlwifi
    │   ├── backport-iwlwifi
    │   └── backport-iwlwifi_git.bb
    └── linux
        ├── linux-intel
        ├── linux-intel_5.10.bb
        ├── linux-intel_5.15.bb
        ├── linux-intel-dev.bb
        └── linux-intel.inc
Setting up Your Build Environment
You can always build a Yocto-based image directly on your host Linux machine, however, there are often many dependencies and based on your own distribution it can be hard to satisfy all the requirements.
To make things easy, Foundries.io has a Docker image with the environment pre-configured to build a Yocto based distribution. To take advantage of it, ensure that Docker is installed on your host machine, then follow the commands in the next section.
First create a folder for your sstate-cache and downloads in the same directory as your lmp folder:
host:~$ cd ..
host:~$ mkdir downloads sstate-cache
It should look like this:
├── downloads
├── lmp
└── sstate-cache
Now run the Docker image with the following commands but make sure you add your path to the folders above:
host:~$ docker run --rm -u builder \
                --name builder \
                -v /path/to/your/lmp/:/build/lmp
                -v /path/to/your/sstate-cache/:/build/lmp/sstate-cache
                -v /path/to/your/downloads/:/build/lmp/downloads \
                -it hub.foundries.io/lmp-sdk
After this command, you will be inside the Docker image.
docker:~$
Building Linux microPlatform Using the Yocto Project
The next set of commands will start your build. After inputting them, the Yocto Project will examine all files related to your image, downloading, building, installing, and ultimately generating the final image and files necessary for booting your device.
To get started, from inside, the Docker image, run the following commands:
docker:~$ cd /build/lmp/
docker:~$ export MACHINE=<machine-name>
docker:~$ export DISTRO=lmp
docker:~$ source setup-environment
The output will be like this, and you will be automatically relocated to the build folder:
Welcome to Foundries.io Linux microPlatform (FIO LMP)

For more information about Linux microPlatform see:
    https://docs.foundries.io/latest/

For more information about OpenEmbedded see their website:
    http://www.openembedded.org/

Your build environment has been configured with:

    MACHINE = am62xx-evm
    DISTRO = lmp

You can now run 'bitbake <target>'

Some common targets are:
    lmp-mini-image          - minimal OSTree + OTA capable image
    lmp-base-console-image  - mini-image + Docker container runtime
    lmp-gateway-image       - base-console-image + edge gateway related utilities
    lmp-factory-image       - default (and only available) at FoundriesFactory

docker:~$
Now, build the default image:
docker:~$ bitbake lmp-factory-image
Output Files
At the end of the build, your build artifacts are found under deploy/images/<machine-name>. The artifact you use to flash your board is lmp-base-console-image-<machine-name>.wic.gz.
Running a Locally Built Image
As mentioned before, the local build doesn't support Over-the-Air updates. For this kind of development, you need to flash the board manually after each iteration of your image. If you are using one of our supported boards, we have detailed instructions on how to flash your device and boot it.
You can find this information in our documentation: Supported Boards
Yocto Project & Linux Tutorial Recap and Conclusion
In this tutorial, we covered the basic principles of the Yocto Project and how they interact with the Linux microPlatform. Understanding these concepts will vital in progressing our AI powered Christmas Tree as we begin to customize our LmP by adding new recipes in the following tutorials.
Continue Building Ai-Powered Christmas Tree
If you are interested in our entire 14-part series on how to build an AI powdered Christmas tree, browse through each section below. Each part brings you closer to mastering your build:
- Part 1: Your First FoundriesFactory AI-Powered Christmas Tree
- Part 2: Configure Network and Wi-Fi
- Part 3: A Yocto & Linux Tutorial for Building An AI-Powered Christmas Tree
- Part 4: Linux MicroPlatform (lmP) Config Tutorial for AI-Powered Christmas Tree
- Part 5: Modify & Extend Linux MicroPlatform for AI-Powered Christmas Tree
- Part 6: Using a MQTT Switch Module on Arduino Portenta X8
- Part 7: Creating a Shell Script Application and Adding to Linux microPlatform™ (MQTT)
- Part 8: Connecting the Web Camera Interface with Docker Container
- Part 9: Using Edge Impulse AI to Recognize Human Presence With Arduino Portenta X8
- Part 10: Enhancing the Image Detection Capabilities of our AI Powered Christmas Tree
- Part 11: Writing a Python App to Turn Our Christmas Tree On/Off Using AI
- Part 12: Creating a Docker Compose App to Automatically Power Your AI Christmas Tree On/Off
- Part 13: Running Docker Compose Application on a Raspberry Pi 4 to Power Our AI Christmas Tree
- Part 14: Managing Multiple SoM Platforms in the Same Factory