

A word of caution, be careful if you flash two devices and then proceed to connect them to the same network.
Welcome to part four of our AI Powered Christmas Tree Series! The goal of this series is to serve as a guide for you to build your own AI powered Machine Learning Christmas Tree, thanks to the Arduino Portenta X8 SoM and Edge Impulse AI Platform.
In this tutorial, we will be including some of the network configurations we implemented on our device to our Linux microPlatform (LmP). Before jumping into this tutorial, be sure to check out the previous entries in the series, especially: Configuring Network and Wi-Fi and Yocto Project Overview and the Linux microPlatform.
LmP Tutorial Introduction
Device Network customizations are common in IoT development. So common in fact, you’re probably going to need to do it for each device in your fleet. Luckily, this does not have to be a manual process! In this tutorial, we will be configuring devices flashed with your LmP image to boot with a static IP or a default Wi-Fi configuration.
Prerequisites for Machine Learning Christmas Tree
This is the fourth entry in our AI Powered Christmas Tree Series, you should follow along with the previous tutorials before continuing.
Adding Recipes to meta-subscriber-overrides
The meta-subscriber-overrides.git repo allows you to customize the packages included in your Factory image. The instructions for sourcing, compiling, configuring, and packaging applications are known as recipes. These can be identified by their .bb suffix.
We are going to add a new recipe to meta-subscribers-overrides to be included in our produced image. In our case, this will enable us to dictate settings for a static IP address, which will then be present on any device flashed with our image.
Modifying your Factory image with new recipes, or even entire layers is a fundamental principle of development with FoundriesFactory; it is how you modify LmP to meet your specific product needs.
Let’s go ahead and add our first recipe. Begin by cloning and entering your meta-subscriber-overrides:
host:~$ git clone https://source.foundries.io/factories/<factory>/meta-subscriber-overrides.git/
host:~$ cd meta-subscriber-overrides/
Before moving ahead, you may wish to read over the Yocto Project Documentation in order to understand the standard file structure and commands which we will use in order to add the recipe.
To add a static IP, we will need to modify the NetworkManager package. This is included in the meta-lmp(BSP) layer. The Linux microPlatform is composed of several OpenEmbedded and Yocto Project layers; you can read on overview of the OpenEmbedded / Yocto Project Layers in our documentation.
It is important to maintain the correct naming and file structure, and to use the following commands in order to create a new directory and networkmanager_%.bbappend file:
host:~$ mkdir -p recipes-connectivity/networkmanager/
host:~$ vim recipes-connectivity/networkmanager/networkmanager_%.bbappend
bbappend Files
bbappend are files created to append a recipe. In this case, networkmanager_% where % means any version.
Since the NetworkManager package is already present in the LmP's meta-lmp layer, we are simply appending our changes to the package.
To do this, we need to add the following content to our newly created networkmanager_%.bbappend file.
Ethernet Version (eth0)
FILESEXTRAPATHS:prepend := "${THISDIR}/${PN}:"

SRC_URI:append = " \
    file://eth0.nmconnection \
"

do_install:append () {
    install -d ${D}${sysconfdir}/NetworkManager/system-connections
    install -m 0600 ${WORKDIR}/eth0.nmconnection ${D}${sysconfdir}/NetworkManager/system-connections
}
Wi-Fi Version (wlan0)
FILESEXTRAPATHS:prepend := "${THISDIR}/${PN}:"

SRC_URI:append = " \
    file://wlan0.nmconnection \
"

do_install:append () {
    install -d ${D}${sysconfdir}/NetworkManager/system-connections
    install -m 0600 ${WORKDIR}/wlan0.nmconnection ${D}${sysconfdir}/NetworkManager/system-connections
}
This will extend the NetworkManager recipe to add the eth0.nmconnection or wlan0.mnconnection connection profile file. It will ensure the file is included in the build and installed in the correct location on your device.
Connection Profile
Now that we have added the location of the connection profile file to the recipe, we need to actually create it and configure the details of the profile. To do this, we create the connection profile with the following commands:
Ethernet Version (eth0)
host:~$ mkdir -p recipes-connectivity/networkmanager/networkmanager/
host:~$ vim recipes-connectivity/networkmanager/networkmanager/eth0.nmconnection
The specific configuration for the profile is below. Copy the following into the file we just created:
[connection]
id=Wired connection 1
uuid=7a0a09e1-6a0e-449f-9d51-9f48ba411edf
type=ethernet
autoconnect-priority=-999
interface-name=eth0

[ipv4]
address1=<static-ip>/24,<gateway-address>
method=manual

[ipv6]
addr-gen-mode=stable-privacy
method=auto
Wi-Fi Version (wlan0)
host:~$ mkdir -p recipes-connectivity/networkmanager/networkmanager/
host:~$ vim recipes-connectivity/networkmanager/networkmanager/wlan0.nmconnection
The specific configuration for the profile is below. Copy the following into the file we just created:
[connection]
id=<NETWORK NAME>
type=wifi
interface-name=wlan0

[wifi]
mode=infrastructure
ssid=<WIFI SSID>

[wifi-security]
auth-alg=open
key-mgmt=wpa-psk
psk=<PASSWORD>

[ipv4]
method=auto

[ipv6]
addr-gen-mode=stable-privacy
method=auto

[proxy]
Pushing the Changes
Add the files you created, then commit your changes and push:
host:~$ git add recipes-connectivity/
host:~$ git commit -m "Adding Static Ip Fragment"
host:~$ git push

Enumerating objects: 8, done.
Counting objects: 100% (8/8), done.
Delta compression using up to 16 threads
Compressing objects: 100% (5/5), done.
Writing objects: 100% (7/7), 851 bytes | 851.00 KiB/s, done.
Total 7 (delta 1), reused 0 (delta 0), pack-reused 0
remote: Trigger CI job...
remote: CI job started: https://app.foundries.io/factories/<factory>/targets/2/
To https://source.foundries.io/factories/<factory>/meta-subscriber-overrides.git/
   9677a0c..28259a8  main -> main
This will trigger a CI platform build, which you can follow at app.foundries.io on the Targets page:
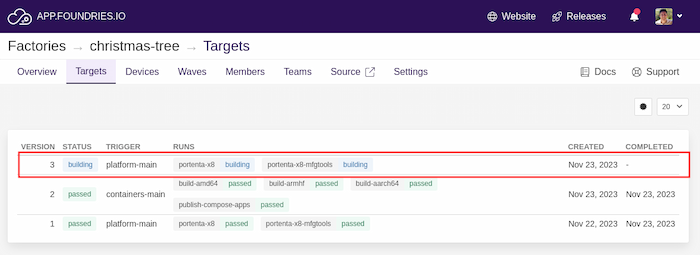
You will see there is a new Target building; once it is done, the new Target will be available for your devices to OTA update to. If you have already registered your device to the Factory, see: Registering Your Device.
Your device will download the new target as soon as it is available. This behavior can be changed depending on your Factory/device configuration.
On your device, you can check what target it is running with:
device:~$ cat /etc/os-release
In this case, it is on Target version 1, waiting for the build of version 2 to update:
Check Targets and wait for your CI job to complete:

After completing, your device will automatically update:
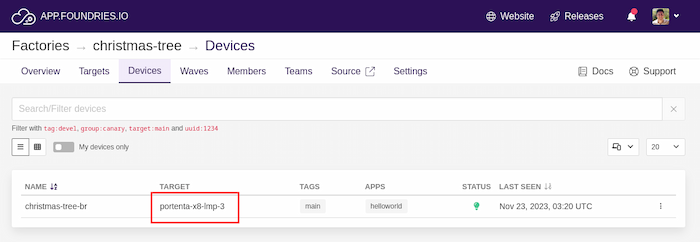
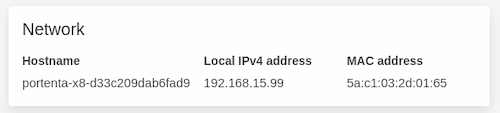
If you click on the device, you can see the new static IP, or if connected on Wi-Fi, the Wi-Fi IP:
LmP Tutorial Recap & Conclusion
In this tutorial, we covered how to extend an existing recipe in your LmP. This addition ensures that devices flashed with the image will have a static IP and connect to a default Wi-Fi. Join us for the next tutorial, where we will continue to extend the LmP with new recipes to enable an MQTT broker.
Continue Building Ai-Powered Christmas Tree
If you are interested in our entire 14-part series on how to build an AI powdered Christmas tree, browse through each section below. Each part brings you closer to mastering your build:
- Part 1: Your First FoundriesFactory AI-Powered Christmas Tree
- Part 2: Configure Network and Wi-Fi
- Part 3: A Yocto & Linux Tutorial for Building An AI-Powered Christmas Tree
- Part 4: Linux MicroPlatform (lmP) Config Tutorial for AI-Powered Christmas Tree
- Part 5: Modify & Extend Linux MicroPlatform for AI-Powered Christmas Tree
- Part 6: Using a MQTT Switch Module on Arduino Portenta X8
- Part 7: Creating a Shell Script Application and Adding to Linux microPlatform™ (MQTT)
- Part 8: Connecting the Web Camera Interface with Docker Container
- Part 9: Using Edge Impulse AI to Recognize Human Presence With Arduino Portenta X8
- Part 10: Enhancing the Image Detection Capabilities of our AI Powered Christmas Tree
- Part 11: Writing a Python App to Turn Our Christmas Tree On/Off Using AI
- Part 12: Creating a Docker Compose App to Automatically Power Your AI Christmas Tree On/Off
- Part 13: Running Docker Compose Application on a Raspberry Pi 4 to Power Our AI Christmas Tree
- Part 14: Managing Multiple SoM Platforms in the Same Factory