

Welcome back to our Arduino UNO Q Elf Detector Series! Last night, my worst fear came true ‐ I pulled out the Christmas decorations, and half the ornaments were gone. Vanished! Replaced by empty hooks and a faint smell of peppermint.
The Elves struck again. I can’t trust physical decorations anymore—they are too easy to pilfer. But do you know what you can't steal? Pixels.
In Part 2: LED Matrix, we mastered hardware control; now it's time to give our hardware a brain. We are abandoning physical ornaments for a voice-controlled virtual Christmas tree running entirely on-device. If I can't have a real tree, I will have a digital one that obeys my every command.
"O Christmas Tree, O [virtual] Christmas Tree…”
In this entry in the series, we will build a voice-controlled virtual Christmas tree which uses Edge Impulse's audio classification model to recognize voice commands. Fortunately, there will be no carolling necessary! Our application will work based on a simple trigger word ‐ “select” from here; name the color you’d like to see, and the tree will update. This is all processed locally on the Arduino UNO Q without any cloud connectivity!
Prerequisites
Before proceeding, you should have completed Part 1 and Part 2.
- An Arduino UNO Q powered and connected to the internet.
- A FoundriesFactory™ Account with a created Factory.
- The
fioupdaemon running and managing updates automatically. - Git configured with your Factory repository cloned.
- A microphone connected to the Arduino UNO Q (ALSA audio device).
- The
arduino-matrix-webuiapplication successfully removed (as shown at the end of Part 2).
This project represents a significant leap from our previous applications ‐ we're now running machine learning inference directly on the device's Linux core.
The Arduino UNO Q's Qualcomm Dragonwing**™** (MPU) is powerful enough to run Edge Impulse's optimized audio classification models in real-time. This means we can process voice commands locally, without sending audio to cloud services.
The Application Architecture
- Microphone (ALSA): Captures audio at 16kHz sample rate.
- Edge Impulse SDK (MPU): Runs audio classification model at ~10Hz.
- Flask Server (MPU): Manages application state and serves the web interface.
- Browser UI: Displays animated Christmas tree and status updates via Server-Sent Events
What's different from our previous applications?
- No MCU involvement: Everything runs on the Linux core.
- No Bridge communication: Pure MPU-side processing.
- Real-time AI inference: Voice recognition happens in milliseconds.
Step 1: Understanding the AI Model
Before we deploy, let's look at the brain of our operation. The application recognizes six specific voice commands:
- select (Activates the listening window)
- blue, green, purple, red, yellow (Changes the tree color)
BYOM ‐ Build Your Own Model
Important: The audio classification model file (deployment.eim) used in this example cannot be redistributed in the public repository. You must provide your own model file for this application to build.
You will need to use Edge Impulse Studio to collect audio data and train your own model. Don't worry, the process is straightforward, and we have outlined the specific parameters we used below.
- Data Acquisition
First, we need to teach our model what to listen for. We will be using Edge Impulse Studio to collect the audio samples.
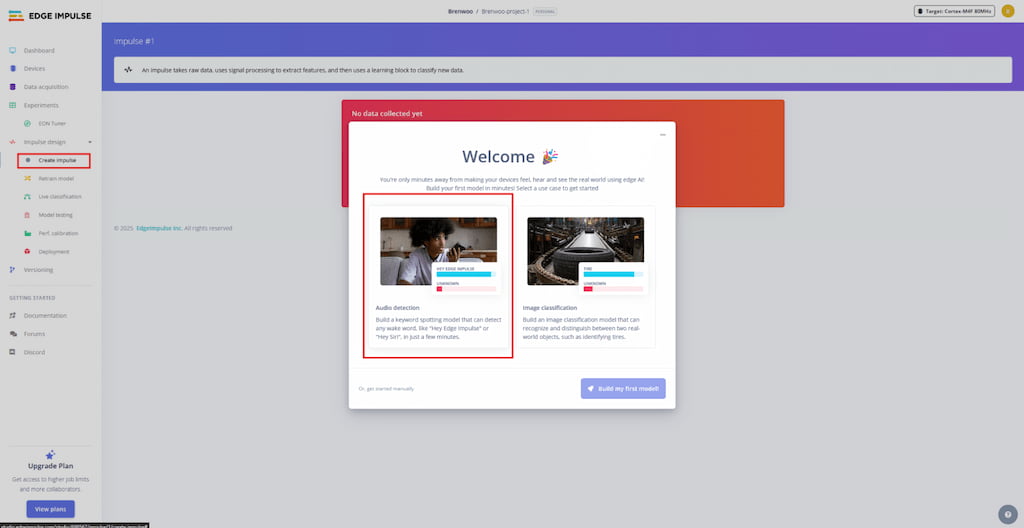
- Create an Account: Navigate to studio.edgeimpulse.com and create a free account.
- If this is your first time logging in, you will be given a brief tour of the platform explaining the basics of how to get started.
- Select create impulse in the sidebar and then audio detection in the popup.
- For new users, follow the wizard to guide you through the process of creating your first impulse.
NOTE: If you are not following the introduction tour wizard, you will find the option to build a dataset in the Data Acquisition section of the sidebar. The data set will later be used to create your impulse.
- Collect Samples: You can use your computer microphone or smartphone to record keywords. For a robust model, aim for at least 50 samples per word, recording in different environments and with different speaking speeds.
For our model, we collected the following dataset:
| Category | Training Set (samples) | Test Set (samples) |
|---|---|---|
| select | 184 | 43 |
| blue | 225 | 57 |
| green | 219 | 60 |
| purple | 73 | 19 |
| red | 231 | 55 |
| yellow | 212 | 55 |
| unknown | 680 | 172 |
| noise | 589 | 130 |
NOTE: Including "noise" (background sounds) and "unknown" (random words) categories is crucial to prevent the model from triggering falsely when it hears silence or unrelated conversation
2. Designing the Impulse
Once the data is collected, we design the "Impulse" the processing pipeline that translates raw audio into classification results.
In the Create Impulse tab, we configured the following parameters:
- Time Series Data
- Window Size:
1000 ms(The length of audio analyzed at once) - Window Increase**😗*
500 ms - Frequency**:
16000 Hz**
- Window Size:
- Processing Block: Select Audio (MFE). This extracts Mel-Frequency Energy features, which are excellent for non-voice audio or simple keyword spotting
- Learning Block: Select Transfer Learning (Keyword Spotting)
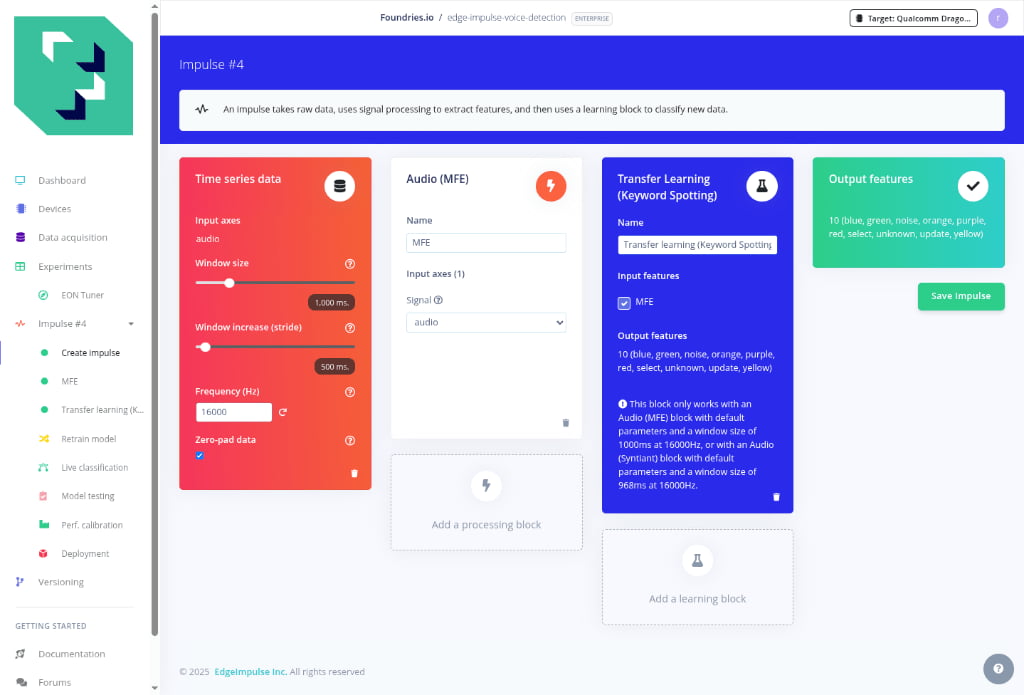
Click Save Impulse once everything is configured.
After saving the impulse:
- Navigate to the MFE tab.
- Keep the default parameters (optimized for voice).
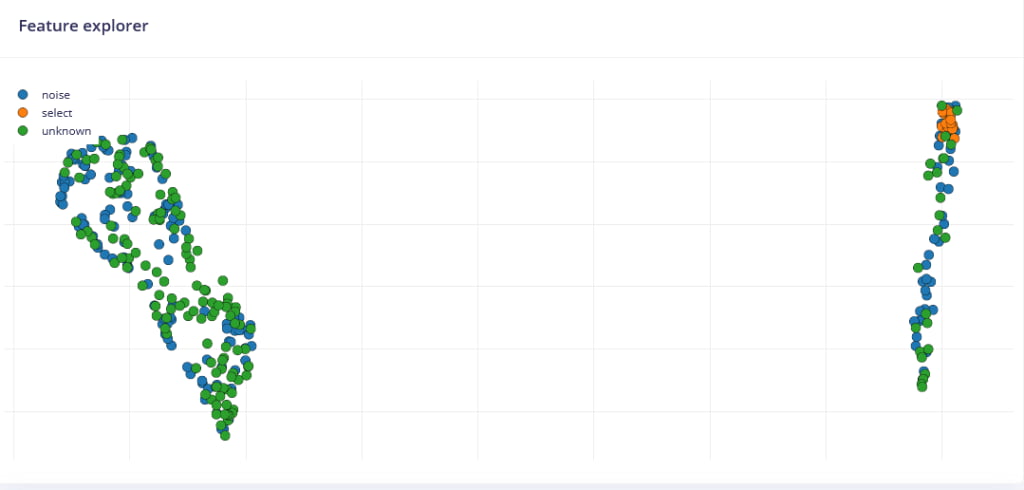
- Click Generate features. This process transforms your raw audio waves into simplified feature maps that the neural network can understand
- Wait for the feature extraction to complete (~2-3 minutes)
- Verify the feature explorer shows distinct clusters for each word
The feature explorer should show your audio samples as points in 2D/3D space, with similar words clustering together.
3. Training the Neural Network
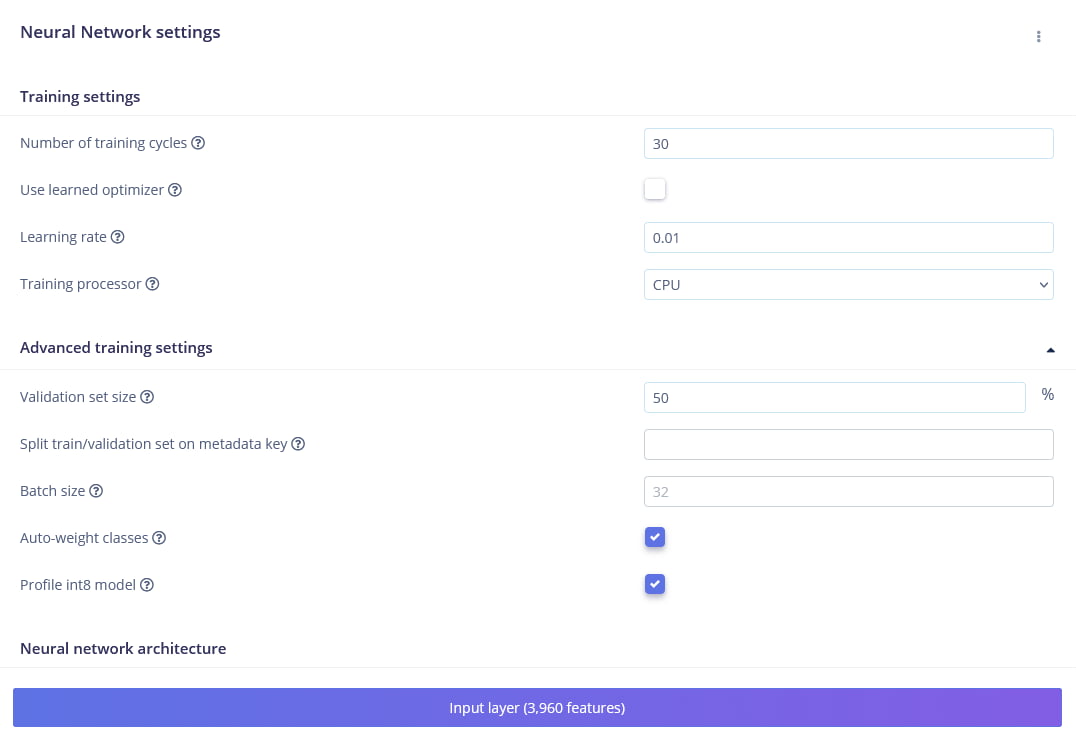
With our features generated, we move to the Transfer Learning tab to train the model.
Configure the following training settings:
- Number of training cycles:
30 - Learning rate:
0.01
Advanced Settings
- Validation set size:
20
Full settings
| Parameter | Setting | Description |
|---|---|---|
| Training cycles | 30 | Number of times the model sees the data |
| Learning rate | 0.01 | Controls how fast the model adapts |
| Validation set size | 20% | Data set aside to validate accuracy |
| Auto-balance dataset | Enabled (✓) | Ensures equal representation of classes |
| Data augmentation | Enabled | Adds noise/pitch shifting to improve robustness |
Click Start training and wait for the process to complete (approximately 5–10 minutes).
Validation: What to look for
- Accuracy: We are aiming for ~95% or higher
- Loss: This number should decrease steadily as training progresses
- Confusion Matrix: Check this grid to see if specific words are being confused with one another (misclassifications)
Troubleshooting: If your accuracy is low (<90%), consider:
- Collecting more diverse audio samples,
- Adjusting the learning rate (try 0.005 or 0.02) or
- Increasing training cycles (try 50–100)
4. Building for the Edge
Once satisfied with the model's performance (you can verify it in the Model testing tab), it is time to export it for our Arduino UNO Q.
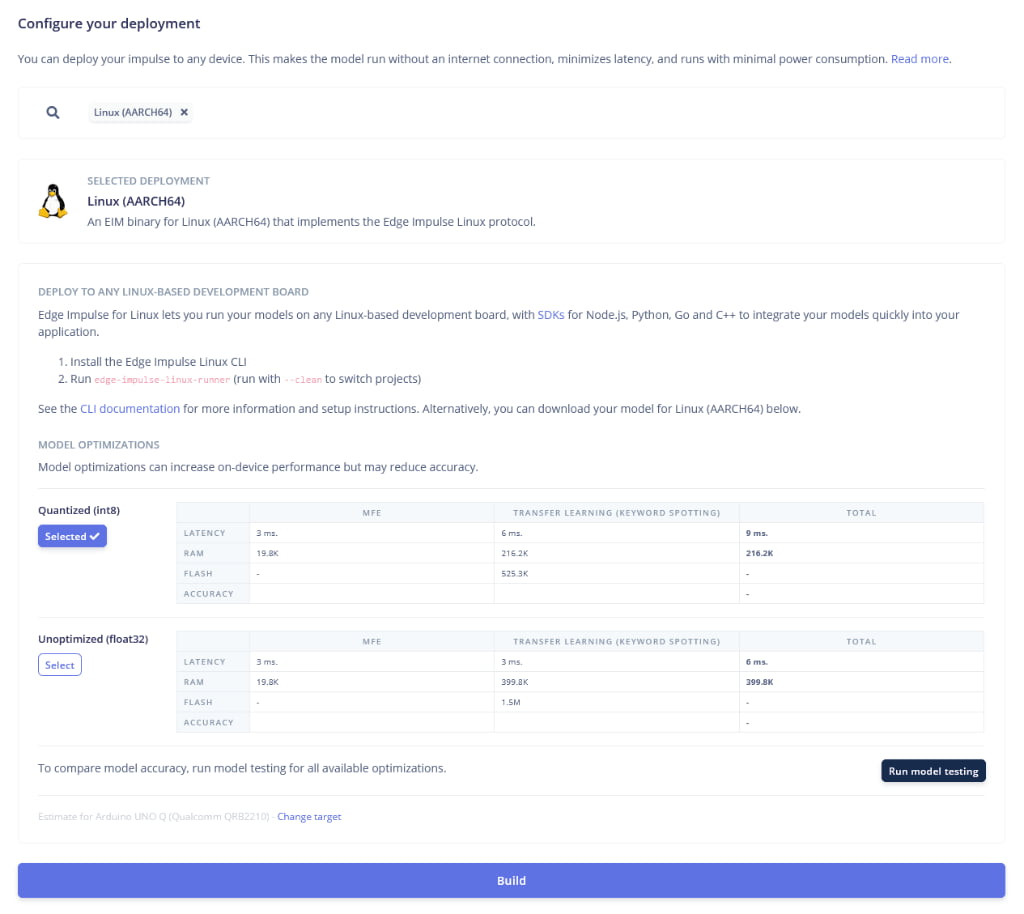
- Navigate to the Deployment tab.
- Search for and select Linux (AARCH64)
- Under Optimization, select Quantized (int8). This reduces the model size and speeds up inference with minimal loss in accuracy.
- At the bottom of the page, locate the performance estimation target. This setting ensures the Latency and RAM estimates shown in the table reflect the capabilities of our device
- Click Change target (if necessary) and select Arduino UNO Q (Qualcomm QRB2210)
- Click Build
The system will generate a.eim file. This single file contains your complete model and the runtime engine required to run it.
5. Preparing Your Model
- Rename your downloaded file to
deployment.eim. - Keep this file handy; we will copy it into our repository in the next step
Note: if you added completely new words (e.g., "Silver" instead of "Red"), you will also need to update the logic in classify.py to handle those new labels
Step 2: Deploying the Voice Application
Since we've done this twice before, the deployment process should feel familiar. However, there is one extra step: adding your model.
Navigate to your containers.git folder and run the following commands to pull the application from our demo repository:
- Update Your Local Repository
host:~$ git remote add arduino-demo https://github.com/foundriesio/containers.git
host:~$ git fetch arduino-demo arduino-demo-25Q4
host:~$ git checkout arduino-demo/arduino-demo-25Q4 -- arduino-voice-webui
- Add Your AI Model Copy your generated
deployment.eimfile into the directory you just checked out. Since binary files are often ignored by Git, you must force add it.
# Copy the model (adjust the source path to where you downloaded the file)
host:~$ cp /path/to/your/deployment.eim arduino-voice-webui/

# Force add the model to git
host:~$ git add -f arduino-voice-webui/deployment.eim
3. Commit and Push Now push the application (with your custom model) to your Factory:
host:~$ git add arduino-voice-webui
host:~$ git commit -m "Adding Arduino Voice-Controlled Christmas Tree demo"
host:~$ git push
What Just Happened?
FoundriesFactory detected the new application and automatically triggered a build job. It is currently compiling a Docker Container that includes the Edge Impulse SDK, installing audio libraries (like pyalsaaudio), and packaging your custom deployment.eim model.
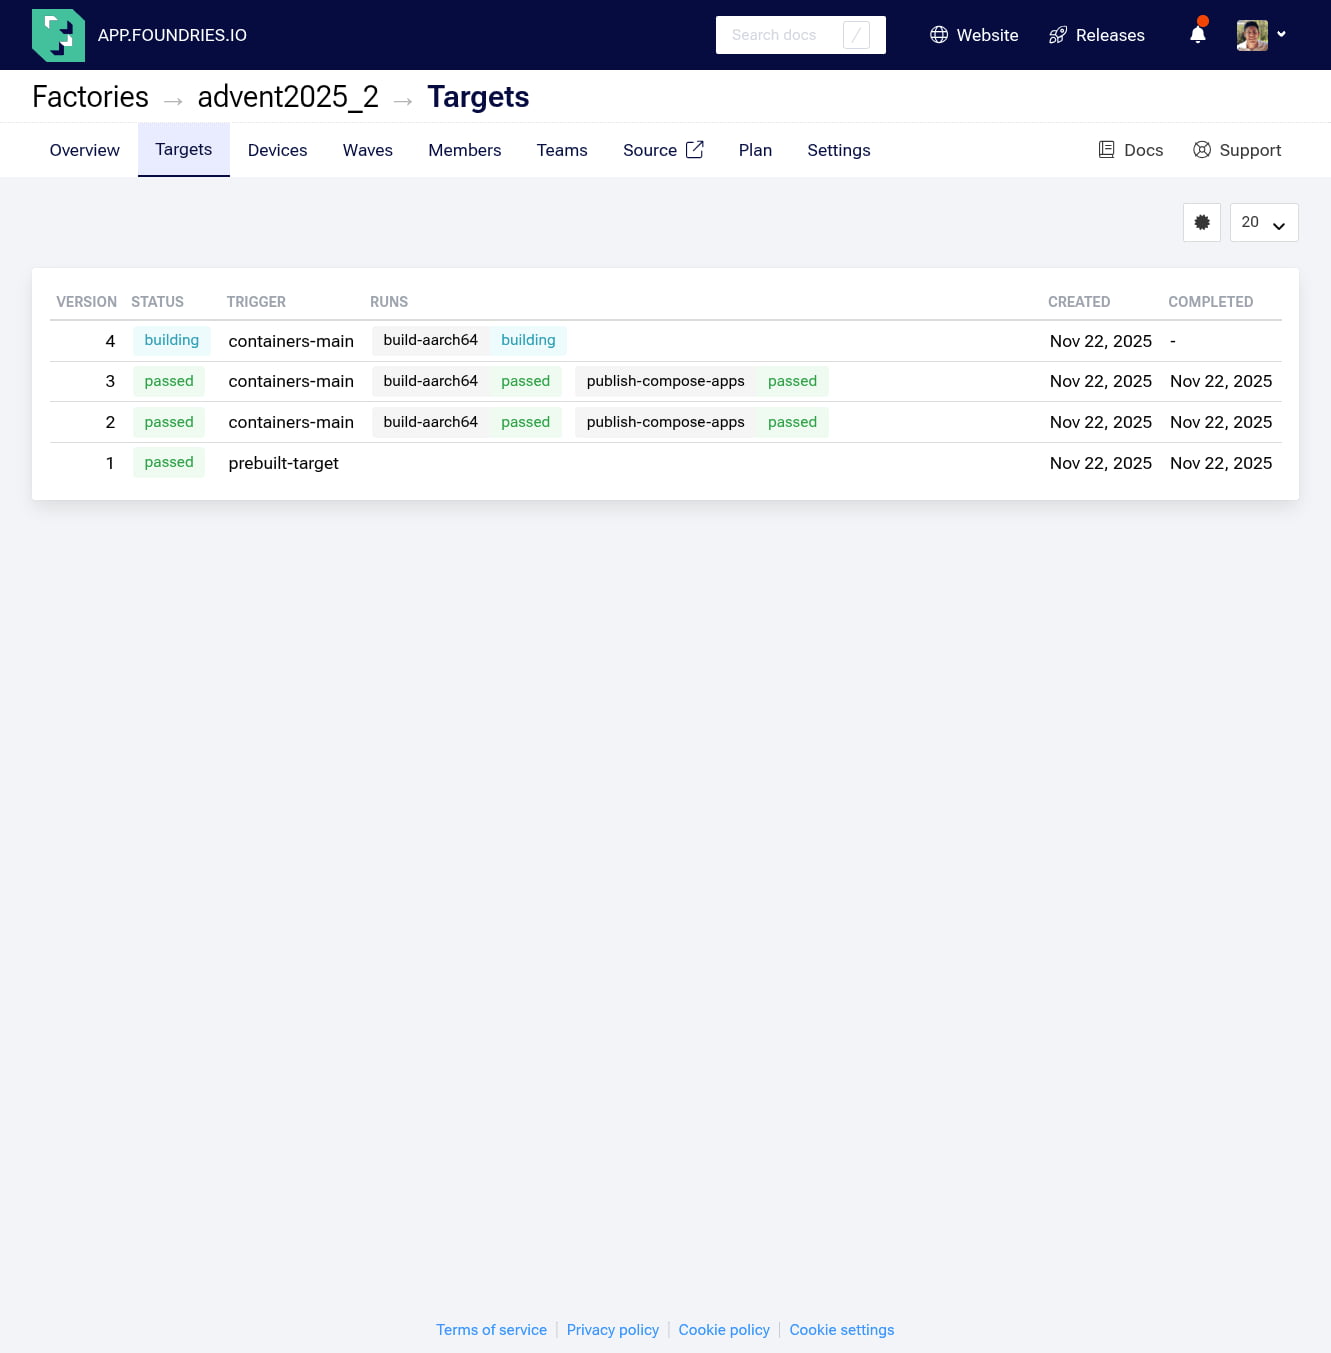
You can monitor the build progress in your Factory dashboard at: https://app.foundries.io/factories/<FACTORY-NAME>/targets/
Step 3: Enabling the Application
Once the build is complete (indicated by a "Passed" status), we need to tell our specific device to run this new container.
We'll use the FoundriesFactory web interface to enable the voice-controlled Christmas tree app.
- Navigate to your devices page: https://app.foundries.io/factories/<FACTORY-NAME>/devices/
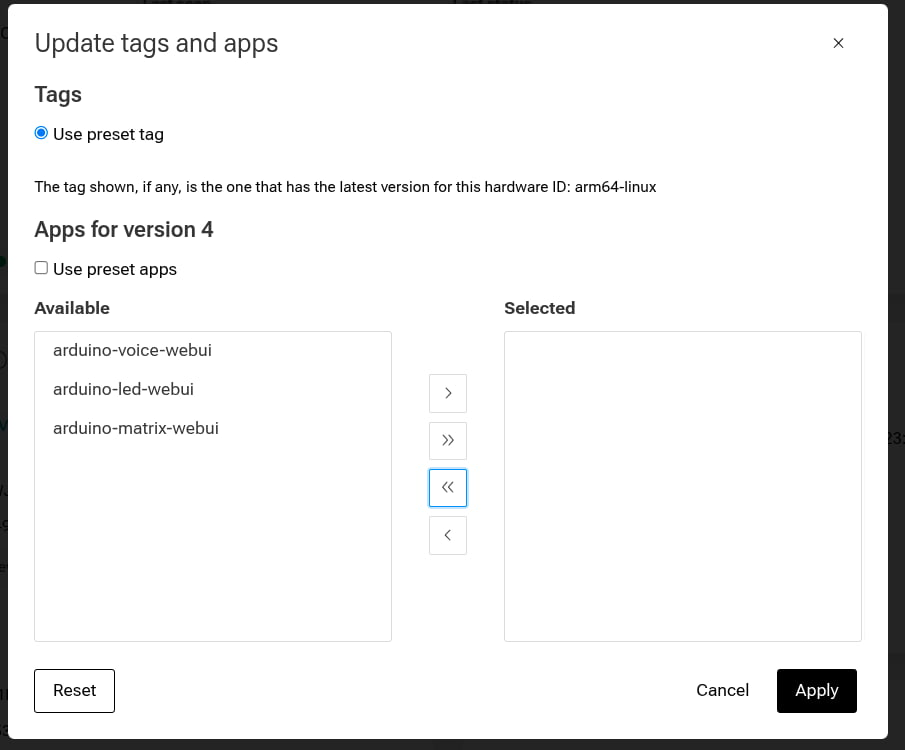
- Select your Arduino UNO Q device and click Update tags & apps
- in the application list, drag arduino-voice-webui from the Available list on the left to the Selected list on the right.
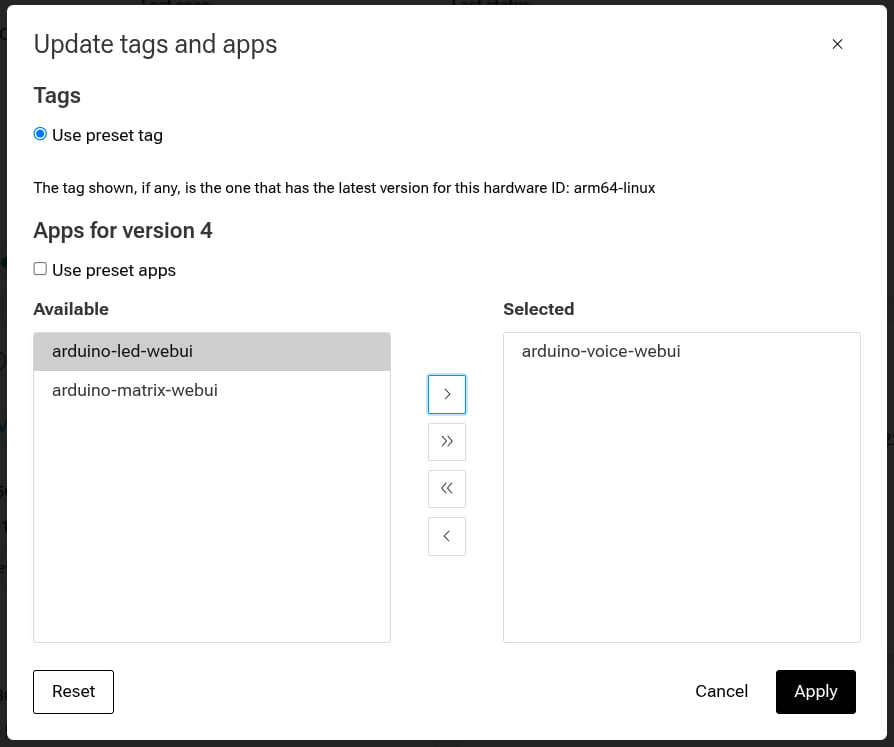
- Click Update
The fioup daemon on your device will detect this configuration change, download the new container (note: this is larger than previous apps due to the ML model), and start it automatically.
You can watch the update occur in real time by check the logs on your device:
device:~$ journalctl -f -u fioup
You will see the daemon fetching the blobs and eventually stating starting arduino-voice-webui ... done.
Expected output:
Nov 22 20:30:15 raul fioup[5003]: [1/6] Checking ... new update from 2 [] to 3 [arduino-voice-webui]
Nov 22 20:30:15 raul fioup[5003]: [2/6] Initializing ... fetch size: 652.3 MiB, 24 blobs; add: [arduino-voice-webui]
Nov 22 20:30:15 raul fioup[5003]: [3/6] Fetching ...
Nov 22 20:30:45 raul fioup[5003]:          100%  [=========================]  652.3 MiB / 652.3 MiB | 24/24 blobs
Nov 22 20:30:45 raul fioup[5003]: [4/6] Stopping ... done
Nov 22 20:30:45 raul fioup[5003]: [5/6] Installing ...
Nov 22 20:30:45 raul fioup[5003]:         Installing app hub.foundries.io/<FACTORY>/arduino-voice-webui@sha256:...
Nov 22 20:30:52 raul fioup[5003]:         Image loaded: hub.foundries.io/<FACTORY>/arduino-voice-webui@sha256:...
Nov 22 20:30:52 raul fioup[5003]:       Done
Nov 22 20:30:52 raul fioup[5003]: [6/6] Starting ...
Nov 22 20:30:53 raul fioup[5003]:         starting arduino-voice-webui --> hub.foundries.io/<FACTORY>/arduino-voice-webui@sha256:... done
Nov 22 20:30:53 raul fioup[5003]:       Done
Step 4: Testing the Voice-Controlled Christmas Tree
Once the update completes, it's time to test the voice recognition!
1. Verify the Container is Running:
Check the device logs to ensure the container started successfully:
divice:~$ docker ps -a
You should see arduino-voice-webui with the status Up. You can also view the logs to confirm the audio device was detected:
device:~$ docker logs arduino-voice-webui-1
Look for [AUDIO] Automatically selected (USB) and Loaded runner for "Foundries.io / edge-impulse-voice-detection"
Expected Output:
Using model: /app/deployment.eim
=== Debug: Checking OpenCV installation ===
OpenCV installed: 4.12.0
============================================
[WEB] Server started at http://0.0.0.0:8000
[CFG] THRESH=0.70 (source=ENV)
[CFG] DEBUG=0.00 (source=ENV)
[CFG] DEBOUNCE_SECONDS=0.50 (source=ENV)
 * Serving Flask app 'classify'
 * Debug mode: off
[AUDIO] Automatically selected (USB): id=0 -> USB PnP Sound Device: Audio (plughw:0,0)
[AUDIO] Device ID chosen automatically: 0
[AUDIO] Hotplug watchdog started (scanning every 1s)
[AUDIO] Automatically selected (USB): id=0 -> USB PnP Sound Device: Audio (plughw:0,0)
[AUDIO] Watchdog: USB present? True
Loaded runner for "Foundries.io / edge-impulse-voice-detection"
selected Audio device: 0
192.168.15.28 - - [23/Nov/2025 00:06:05] "GET /status HTTP/1.1" 404 -
192.168.15.28 - - [23/Nov/2025 00:06:11] "GET /status HTTP/1.1" 404 -
2. Accessing the Web Interface
On any machine on the same network as your device open a browser and navigate to: http://<device-ip>:8000
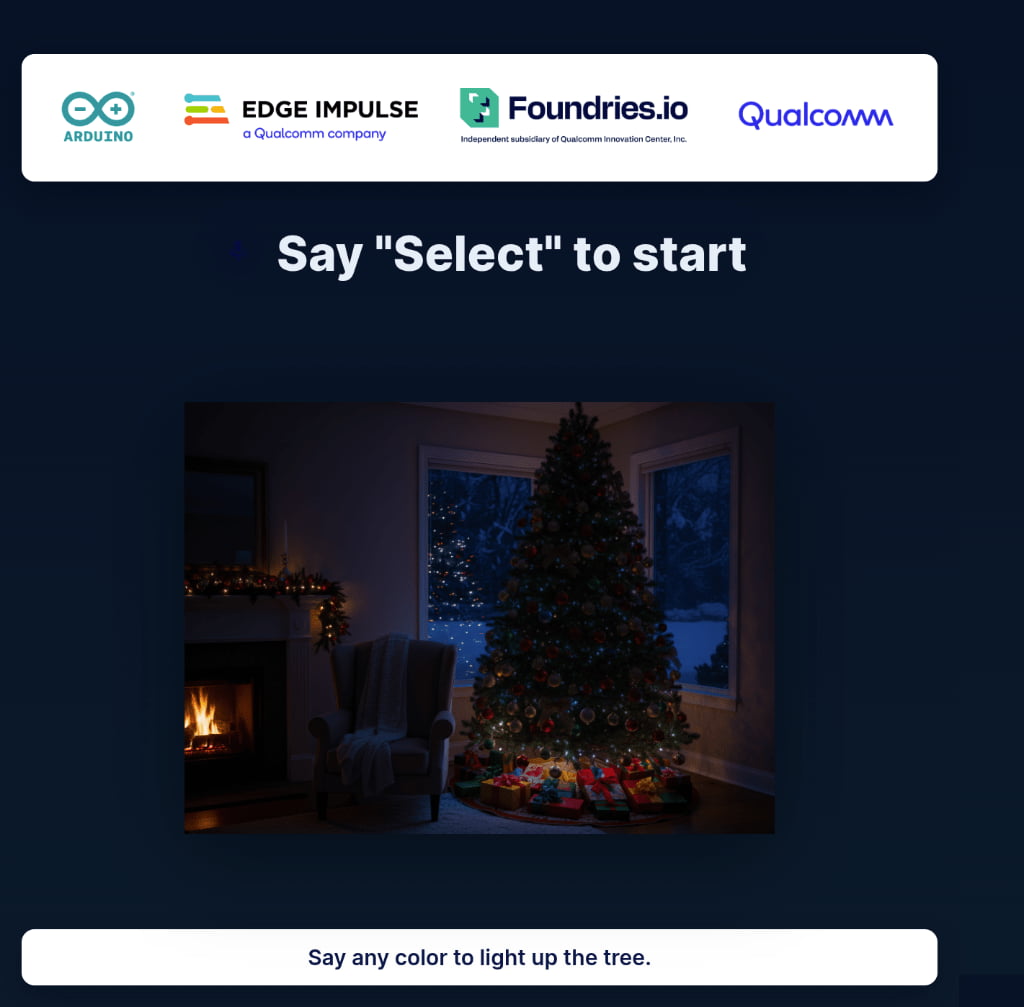
You will see a dark Christmas tree and the status text "Say 'Select' to start"
3. Test Voice Commands
Important: The microphone must be properly connected to the Arduino UNO Q's audio input.
- Activate: Speak clearly and say "Select". This will activate the control window.
- Validation: The UI status updates to "Select the Color," and a listening animation appears. A 10-second window is now open. Physical LEDs may blink to acknowledge activation
- Command: Within that window, say a color, for example, "Blue"
- Validation: The tree lights turn blue
- Reset: Wait 10 seconds. The tree will automatically return to its dark state, ready for the next "Select" command

Go ahead and try the other colors: Green, Purple, Red, and Yellow
Note: The system uses a state machine with a cooldown. If you say a color without saying "Select" first, nothing will happen. This prevents accidental triggers.
You can also test some edge cases:
- Say a color without saying "select" first → Nothing happens (intentional)
- Say "select" twice quickly → Second "select" is suppressed (cooldown protection)
- Wait more than 10 seconds after "select" → Window expires, must say "select" again
- Say multiple colors rapidly → Only first color within window is recognized
Step 5: Understanding the Technology Stack
Now that we have the application running lets take a moment to dive a little deeper into understanding how everything works together. Our arduino-voice-webui combines several advanced technologies together in order to create a responsive web interface controlled via voice commands.
1. The Edge Impulse Components
At the core of everything is the Edge Impulse Linux SDK, optimized for x86_64 and ARM64 architectures.
- AudioImpulseRunner: A specialized Python class that handles the continuous audio stream
- Feature Extraction (MFCC): Before classification, raw audio is converted into Mel-Frequency Cepstral Coefficients; frequency features that the model can understand
- Neural Network: The trained classifier processes these features to output a confidence score
2. The application logic (Flask)
We use Flask not just as a web server, but as the state manager for the application.
- Threaded Server: To handle the microphone input and web clients simultaneously, the server runs in threaded mode.
- State Management: A thread-safe locking mechanism ensures that when the AI detects "Blue," the state updates cleanly without race conditions.
- Timer Management: This logic handles the "auto-reset," counting down 10 seconds before returning the tree to its idle state.
3. The Web Interface
The frontend is designed for real-time reactivity without the need for constant page refreshes.
- Server-Sent Events (SSE): Instead of polling the server every second ("Is it blue yet?"), the browser opens a persistent connection. The server pushes updates immediately when the state changes.
- CSS & Animations: Smooth transitions and glow effects are handled by the browser's rendering engine, while preloaded images ensure instant color changes.
The Architecture Diagram
Here is the complete data flow, from the physical microphone to the pixels on your screen:

Step 6: Removing the application
When you're ready to move on or free up resources, follow these steps to cleanly remove the voice application.
Disable via FoundriesFactory UI:
- Navigate to your devices page: https://app.foundries.io/factories/<FACTORY-NAME>/devices/
- Select your Arduino UNO Q device from the list

3. Click on "Update tags & apps"
4. Move arduino-voice-webui from Selected back to Available:
5. Click Apply.
The fioup daemon will remove the application automatically. You can verify this by running docker ps -a on the device; the container should be gone
device:~$ docker ps -a
CONTAINER ID   IMAGE     COMMAND   CREATED   STATUS    PORTS     NAMES
Your device is now clean and ready for the next application!
Conclusion
We have successfully given our Arduino UNO Q a voice and a brain. By deploying an Edge Impulse audio classification model, we moved beyond simple hardware control into the realm of intelligent Edge AI. Crucially, we did this while maintaining complete operational security; every voice command was processed locally on the Qualcomm Dragonwing™ MPU, ensuring that my strategic commands remain private from prying elven ears.
But while my virtual tree is safe behind a screen, my physical living room remains a crime scene. A voice command might change a pixel, but it won't catch a thief in the act. To stop the disappearances, I need eyes on the ground.
In the next part, we are going to escalate this arms race. We will build a Real-Time Elf Surveillance System using computer vision. We'll learn how to deploy a YOLOv5 object detection model that can identify—and track—my nemesis the moment they step into the frame.
Resources
For a deeper dive, explore the repository to gain a better understanding of the code.