
Welcome back to our Arduino UNO Q Elf Detector Series! In Part 3, we deployed a virtual tree that changed colors using audio classification. But it isn't enough to get by virtual stand-ins. I’m done with disappearing ornaments and cutting cables. Passive defense is over. It is time to go on the offensive.
I need proof. I need a mugshot. I need to catch these little saboteurs on camera. Now that we understand Edge AI for audio, it’s time to escalate to computer vision.
In this entry, we will build a real-time object detection system using Edge Impulse's YOLOv5 model to detect and identify objects through a USB camera all processed locally on the Arduino UNO Q, without any cloud connectivity!
Prerequisites
To follow this guide, you should have completed the previous parts of this series. You will need:
- Hardware:
- An Arduino UNO Q board powered and connected to the internet
- A USB camera connected to the Arduino UNO Q (accessible as
/dev/video0)
- Software:
- A FoundriesFactory™ Account with your Factory created
- An Edge Impulse Account
- The
fioupdaemon running and managing updates automatically - Git configured with your Factory repository cloned
Note: If you have the arduino-voice-webui application from Part 4 still running, please disable it via the FoundriesFactory UI before proceeding to ensure a clean slate.
The Application Architecture
This project builds upon the Edge AI foundation from Part 3, but now we are processing visual data instead of audio. While object detection is computationally intensive, the Arduino UNO Q's Qualcomm Dragonwing™ MPU handles it efficiently.
We are running the optimized YOLOv5 Pico model, which allows us to detect multiple objects in each video frame at approximately 17 frames per second (FPS).
Here is how the system operates:
- USB Camera (OpenCV): Captures video frames at 640×480 resolution.
- Edge Impulse SDK (MPU): Runs the YOLOv5 object detection model at approximately ~17 FPS.
- Flask Server (MPU): Manages video streaming and serves the web interface.
- Browser UI: Displays the live MJPEG video stream with bounding boxes via Server-Sent Events.
The entire pipeline—video capture, inference, and streaming—happens locally. No video data ever leaves the device.
Step 1: Building the AI Model
To follow along with the code logic and model configuration, you can explore the source files in our public repository now: Arduino Demo Repository
The ardunio-elf-webui application is trained to detect 2 object classes:
elf– Christmas elf figurines.person– Human faces and bodies
Important: Bring Your Own Model (BYOM)
Unlike our previous audio application, the object detection model file (model.eim) cannot be redistributed in the public repository. You must provide your own model file for this application to build.
A Note on YOLOv5 Availability: The specific model architecture we rely on for this project—YOLOv5—is no longer available as a built-in default block in Edge Impulse due to recent policy changes regarding third-party training pipelines.
If you are training a new model or retraining an existing one, you must manually add this block back to your Edge Impulse project:
- Visit the Edge Impulse YOLOv5 Block Repository.
- Follow the instructions in the
READMEto add the custom block to your organization or project (it takes just a few minutes). - Once added, return to the Impulse Design tab, select Choose a different model, and pick YOLOv5 to retrain your pipeline.
Once your environment is set up, you have two options to get the model file:
- Option A: Use the Pre-Configured Setup (Recommended): Follow the
model.eim.exampleinstructions included in our demo repository. This guide will help you quickly generate a compatible model. - Option B: Train with Your Own Objects (Advanced): Use Edge Impulse Studio to collect and label your own image data (remembering to add the custom YOLOv5 block first!) and train a model for entirely different object classes.
Step 2: Understanding the Vision Logic
Before we deploy, let's understand how the application visualizes "thought." The Python code (main.py) running on the MPU handles the complex task of capturing video, running inference, and managing the web stream simultaneously.
1. The Inference Engine
At the heart of the application is the run_object_detection function. We use the ImageImpulseRunner from the Edge Impulse Linux SDK to handle the heavy lifting.
Crucially, the code doesn't just pass the raw image to the model; it first extracts features using specific settings defined in Edge Impulse Studio:
# From main.py
def run_object_detection(image, confidence_threshold=0.1):
    # Convert PIL Image to numpy array
    img_array = np.array(image)

    # Get features using auto-calculated Studio settings
    features, cropped = edge_impulse_runner.get_features_from_image_auto_studio_settings(img_array)

    # Run the classification on those features
    res = edge_impulse_runner.classify(features)
2. Coordinate Scaling
One common challenge in object detection is mapping the model's output back to the real world. The model might analyze a cropped, 224x224 square of the image, but our camera is capturing 640x480 video.
The code automatically calculates this scale factor to ensure the bounding boxes appear in the correct location on the video feed:
# Scaling logic in run_object_detection
if 'bounding_boxes' in res['result']:
    for bbox in res['result']['bounding_boxes']:
        # ... logic to extract dimensions ...

        # Scale coordinates from model input size back to original frame size
        x = int(bbox.get('x', 0) * orig_width / cropped_width)
        y = int(bbox.get('y', 0) * orig_height / cropped_height)

        detections.append({
            "class_name": bbox.get('label', 'unknown'),
            "confidence": confidence * 100,
            "bounding_box_xyxy": [x, y, x + width, y + height]
        })
3. Performance Optimization & Streaming
Running AI inference on every single video frame can result in a laggy video feed. To solve this, the application uses a smart threading strategy in the generate_camera_frames function.
It separates rendering from inference. The camera streams at full speed (approx. 30 FPS), but we only run the heavy AI detection logic every 50 frames. The bounding boxes from the last detection are "sticky"—they remain drawn on the screen until the next detection updates them.
# From generate_camera_frames
frame_counter += 1
if frame_counter % 50 == 0:
    # Run heavy detection only occasionally
    results = run_object_detection(pil_image)
    if results:
        last_detections = results["detection"]

# Draw the 'last known' detections on the current high-speed frame
if last_detections:
    for obj_det in last_detections:
        # ... OpenCV drawing logic ...
        cv2.rectangle(display_frame, (x1, y1), (x2, y2), (0, 255, 0), 2)
4. Visualizing Confidence
We don't just show what is detected, but how sure the AI is. The application defines a CONFIDENCE_MAP that assigns specific colors to different confidence tiers, giving you immediate visual feedback on the model's accuracy.
CONFIDENCE_MAP = {
    (0, 20): "#FF0976",    # Pink (Low confidence)
    (21, 40): "#FF8131",   # Orange
    (41, 60): "#FFFC00",   # Yellow
    (61, 80): "#00DED7",   # Light blue
    (81, 100): "#1EFF00",  # Green (High confidence)
}
Step 3: Deploying the Container
Now that we have a better understanding of how the application works. It is time to deploy it onto our Arduino UNO Q.
IMPORTANT: There is no model supplied with our public repository. You must provide your own, following the steps outlined above!
- Update your local repository: In your host terminal, navigate to your
containers.git folder. We will pull the latest application code from the demo repository:
host:~$ git remote add arduino-demo https://github.com/foundriesio/containers.git
host:~$ fetch arduino-demo arduino-demo-25Q4
host:~$ git checkout arduino-demo/arduino-demo-25Q4 -- arduino-elf-webui
- Add your AI model: Copy your generated
model.eimfile into the directory you just checked out. Since binary files are often ignored by Git, you must force add it.
host:~$ cp /path/to/your/model.eim arduino-elf-webui/
host:~$ git add -f arduino-elf-webui/model.eim
- Commit and Push: Send the code to your Factory to trigger the build. This will compile a container that includes heavy dependencies like OpenCV and the Edge Impulse Linux SDK:
host:~$ git add arduino-elf-webui
host:~$ git commit -m "Adding Arduino Object Detection demo"
host:~$ git push
FoundriesFactory will detect the new application and trigger a CI/CD build job, compiling the container with the Edge Impulse SDK and OpenCV. You can monitor the build progress on your Factory dashboard:
https://app.foundries.io/factories/<FACTORY-NAME>/
Step 4: Enabling the Application via Web UI
Once the build completes (look for the green "Passed" checkmark on your Factory Dashboard), we will use the FoundriesFactory Web UI to enable this application Over-the-Air (OTA).
- Navigate to the Devices page in your FoundriesFactory:
https://app.foundries.io/factories/<FACTORY-NAME>/devices/. - Select your ARDUINO UNO Q device.
- Click "Update tags & apps".
- Move
arduino-elf-webuifrom the Available (left) list to the Selected (right) list. - Click "Apply".
The fioup daemon on your device will detect the configuration change, download the new container, stop old applications, and launch the object detector with access to the USB camera (be sure and plug one in!)
Step 5: Testing the Object Detection System
Allow 2–3 minutes for the update to complete. Before jumping into the browser, it is good practice to verify that the container has started correctly on the device.
1. Verify the Container is Running. Connect to your device terminal and run:
device:~$ docker ps -a
You should see arduino-elf-webui listed with the status Up.
2. Check the Logs. Confirm the camera was detected, and the model loaded successfully:
device:~$ docker logs arduino-elf-webui-1
You are looking for output similar to this:
[CAMERA] Camera started
[MODEL] Loading Edge Impulse model: /app/model.eim
[OK] Model loaded successfully!
[SERVER] Running on http://0.0.0.0:8000
3. Access the Web Interface
Once you see the server start message, open a browser on the same network and navigate to: http://<arduino-ip>:8000
4. Test the Detection
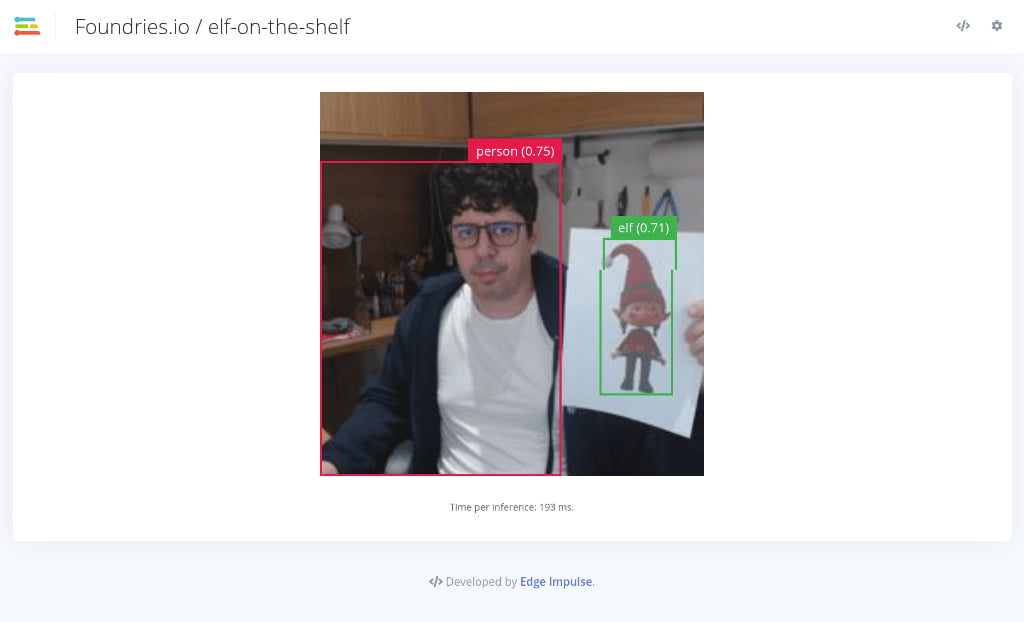
Verify the Stream: You should see the live video feed, a confidence legend, and an FPS counter hovering around ~17 FPS.
Test the Detection:
- Point the camera at yourself: You should see a bounding box labeled "person" appear around your face or body.
- Introduce an Elf: Hold up a Christmas elf figurine (or the object you trained for). A second box labeled "elf" should appear.
- Check the Colors: Move the objects around. As the model becomes more or less sure of the object, the bounding box color will shift from green (high confidence) to orange/pink (low confidence).
With ~58ms latency per frame, you are witnessing cutting-edge AI performance that works entirely offline, maintaining complete privacy.
Step 6: Cleanup
To prepare for the final part of this series—where we will run multiple containers simultaneously—we should keep our device clean.
- Go back to your Devices page on the FoundriesFactory dashboard.
- Click Update tags & apps.
- Move
arduino-elf-webuifrom Selected back to Available. - Click Apply.
The fioup daemon will automatically remove the container, freeing up resources for our grand finale.
Conclusion
Congratulations! You have successfully deployed a complete Edge AI computer vision system on the Arduino UNO Q.
In this chapter, we gave our device "eyes" to match the "ears" we gave it in Part 3. By deploying YOLOv5, we moved beyond simple sensor data into the realm of complex visual understanding. What makes this achievement significant is that we did it entirely on the edge:
- Real-Time Object Detection: We achieved approximately 17 FPS using the optimized YOLOv5 Pico model.
- Privacy by Design: The video stream and inference processing never leave the device, ensuring complete local privacy
- Seamless Updates: Despite the complexity of adding computer vision libraries and AI models, FoundriesFactory allowed us to deploy the entire application Over-the-Air with a simple Git push
In Part 5, we will bring it all together. We will combine the Voice Control, the LED Matrix, and this Object Detection system into one integrated, message-driven holiday monitoring application. See you there!
For a deeper dive into the code used in this tutorial, you can explore the repository files here: