

Welcome back to the Arduino UNO Q Elf Detector Series. I’m happy to report that the Arduino UNO Q survived the first night! I left a decoy microcontroller on the workbench, an old 8-bit board with bent pins, and sure enough, it was gone this morning. But the Arduino UNO Q remained safe in my hidden drawer.
In Part 0: Introduction, we successfully unboxed the device and connected it to the FoundriesFactory™ cloud using the fioup agent. Now that our device is online and listening for updates, we need to establish a perimeter. It is time to deploy our first application: a web-based LED controller that demonstrates the Arduino UNO Q dual-core architecture.
In this part, we will demonstrate how to use the power of the FoundriesFactory platform CI/CD. We will write our code on our host machine, push it to our Factory's Git repository, and watch as the platform automatically builds the application and deploys it to the Arduino UNO Q over the air.
Prerequisites
Before proceeding, you must have completed Part 0: Board Setup and Factory Onboarding.
To follow this guide, you should have:
- An Arduino UNO Q powered and connected to the internet.
- A FoundriesFactory Account with a created Factory.
- The fioup agent installed and the device registered.
- Git installed on your host computer.
The Hardware Architecture
Before we begin, let's recap some of the features of the hardware we will be taking advantage of, the Arduino UNO Q features two processing cores:
- Qualcomm Dragonwing™ MPU: Runs Linux® (Debian). This will host our Python web server.
- STM32U5 (MCU): A real-time microcontroller. This will handle the physical LED control.
The Bridge:
We will use the Arduino Bridge to connect these two worlds. Our Linux application will communicate with the MCU over a Unix socket, allowing a web page to trigger real-time hardware events.
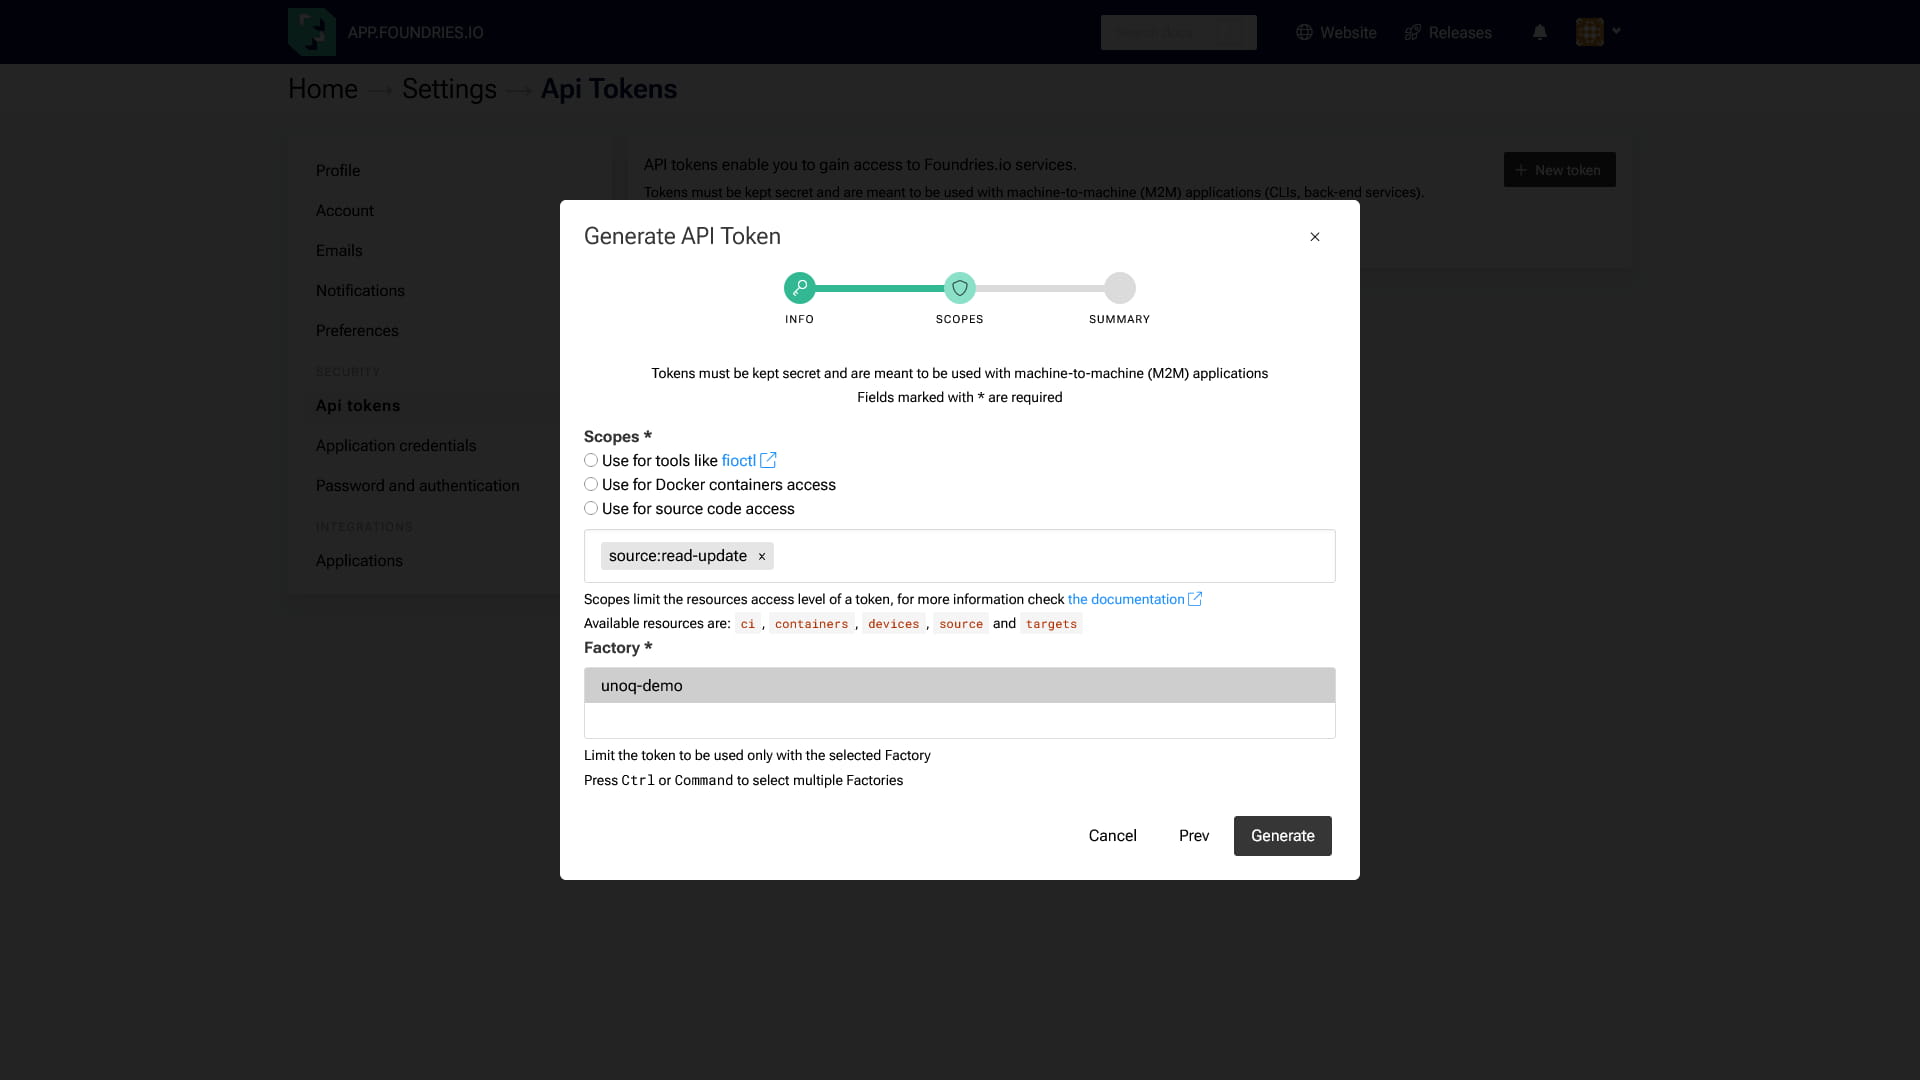
Step 1: Create an API Token
To interact with your Factory's source code securely, you need an API token.
Go to your Factory https://app.foundries.io/factories/<factory-name>/ and click on your avatar on the right top corner. Select Setting and API Token.
- Navigate to your Factory dashboard at https://app.foundries.io/factories/\<factory-name>/.
- Click on your Avatar in the top right corner and select Settings, then API Token.
- Click Create New Token.
- Crucial Step: Ensure you select the source:read-update scope. This permission allows you to push code to the repository.
- Give it a description (e.g., "Dev Machine") and an expiration date.
- Click Generate and copy your token immediately.
Step 2: Clone Your Factory Repository
When you created your Factory, the platform automatically provisioned a private Git repository for you. This is where your source code lives.
- Navigate to the Source tab in your FoundriesFactory dashboard and copy the clone URL.
- On your host machine, clone the repository using the token you just created:
host:~$ export FACTORY=<FACTORY-NAME>host:~$ export TOKEN=<TOKEN>
host:~$ git clone https://[email protected]/factories/$FACTORY/containers.git
host:~$ cd containers/
You will see a folder structure ready for your applications.
We will create a new directory for our project inside containers/
Step 3: Understanding the Application
We are about to push a small demo app to the device. It is a web-based dashboard that gives you direct control over the board's hardware. By accessing a website hosted locally on the device, you can toggle the LEDs on and off with a click, instantly translating a browser command into a physical action.
Before we deploy it, let's look at how it works. The application consists of three main components inside the led-controller directory:
1. The Dockerfile
This file tells the Factory CI how to build the app. Crucially, it installs arduino-cli and openocd. This allows the container to compile and update the MCU firmware inside the application every time it starts.
2. The MCU Firmware (sketch.ino)
This C++ code runs on the STM32U5. It registers the toggle_led function so the Linux side can call it using Bridge.provide().
3. The Web Server (main.py)
This Python script runs on the Linux MPU. It serves a web page and uses Bridge.call("toggle_led") to send commands to the MCU.
Step 4: Deploying the Code
To save you from manually creating every file, we have prepared a demo repository. We will pull the code from our demo repo and push it to your Factory.
Inside your containers.git folder, run the following commands:
- Add the demo remote:
host:~$ git remote add arduino-demo https://github.com/foundriesio/containers.git
host:~$ git fetch arduino-demo arduino-demo-25Q4
- Checkout the application folder:
host:~$ git checkout arduino-demo/arduino-demo-25Q4 -- arduino-led-webui
- Push to your Factory
host:~$ git commit -m "Adding Arduino LED WebUI demo"
host:~$ git remote remove arduino-demo
host:~$ git push
What Just Happened?
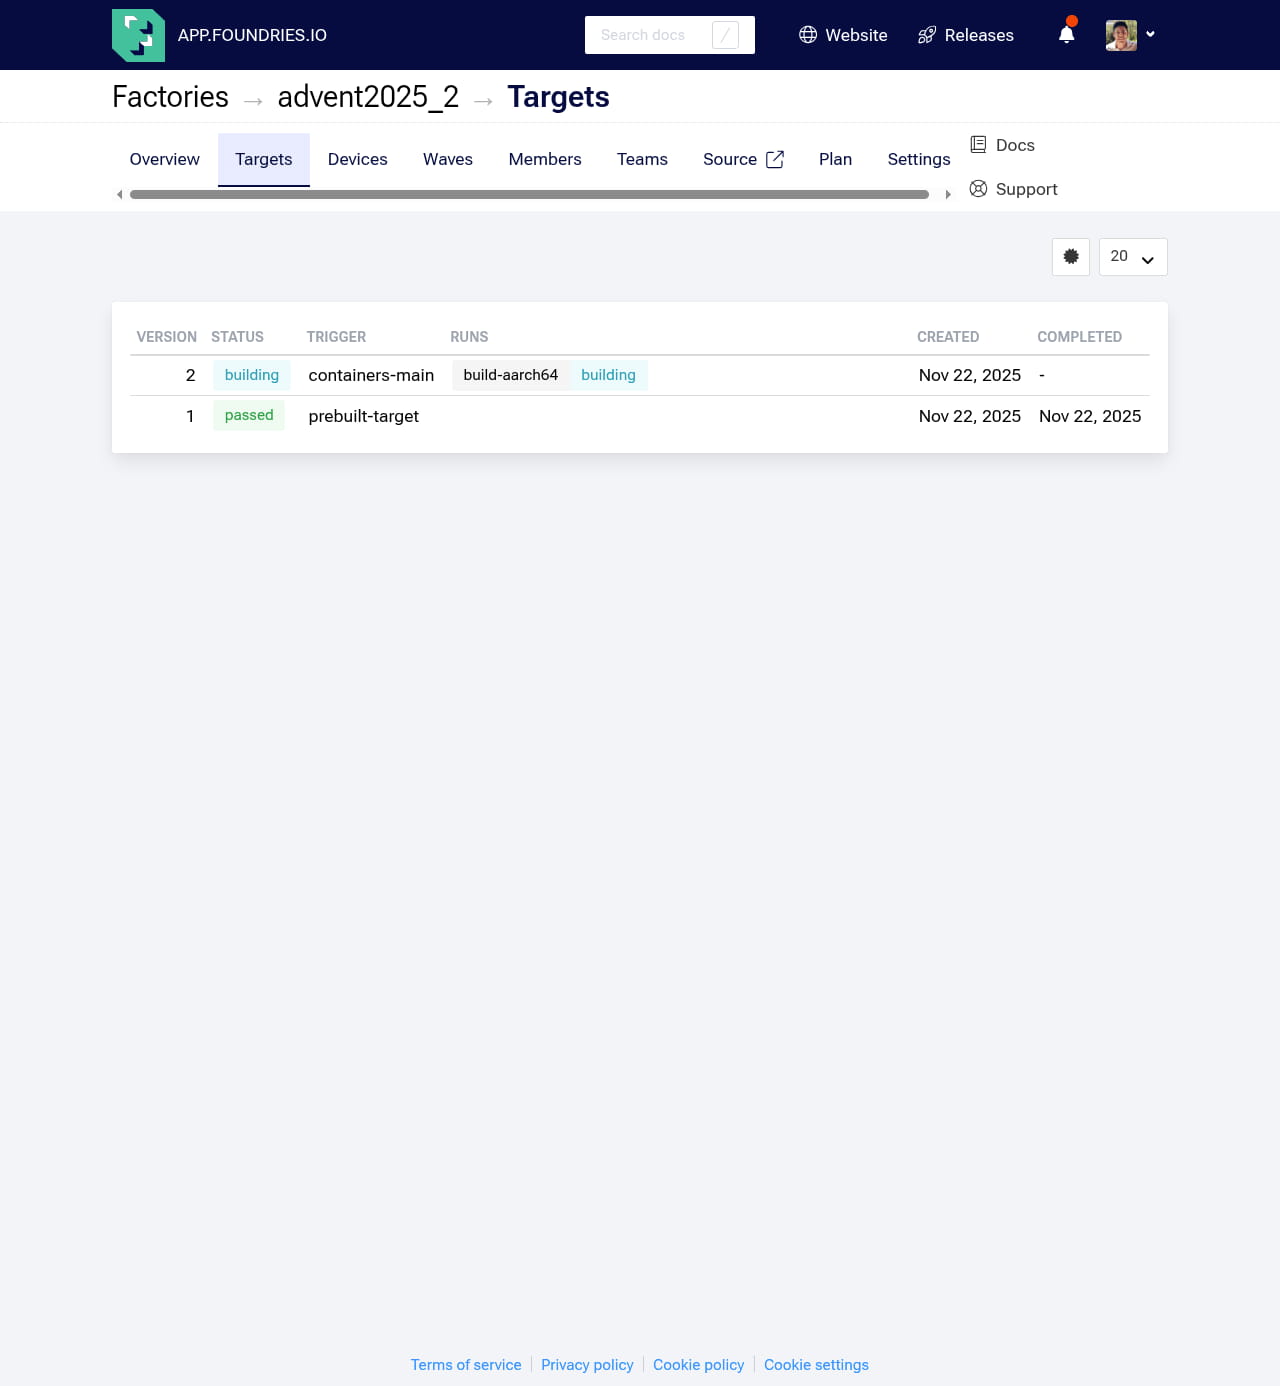
When you pushed the code, FoundriesFactory automatically triggered a new Job in the CI/CD pipeline. It is now building your application in the cloud.
Step 5: Updating the Device
By default, the fioup daemon on your device is not set to automatically apply every update immediately. For this tutorial, we will trigger the update manually to see the process in action.
- Wait for the build to finish in your FoundriesFactory dashboard.
- On your device (via ADB or SSH), check for the update:
device:~$ fioup check
- You should see output indicating a new version is available
device:~$ fioup check

- - - - Output Example - - - New version available: arm64-linux-2. Please run 'fioup update' to get it.
- Apply the update:
device:~$ fioup update
- The device will verify the target, download the new Docker images, and install them.
device:~$ fioup update

- - - - Output Example - - -
[1/6] Checking ... new update from -1 [] to 2 [arduino-led-webui]
[2/6] Initializing ... fetch size: 647.4 MiB, 23 blobs; add: [arduino-led-webui], remove: [], sync: [], update: []
[3/6] Fetching ...
         100%  [=========================]  647.4 MiB / 647.4 MiB | 22/23 blobs | Cur:       0 B/s | Avg: 11.56 MiB/s | Time: 56s | ETA: 12:30:35 (done)

[4/6] Stopping ... done
[5/6] Installing ...
        Installing app hub.foundries.io/advent2025/arduino-led-webui@sha256:d5404ecc3861c90251
        Loading image hub.foundries.io/advent2025/arduino-led-webui@sha256:8e71ead7eebc75aff4
        	b89cf3e  100%  [=========================]
        	94edf93  100%  [=========================]
        	474700f  100%  [=========================]
        	d688e50  100%  [=========================]
        	5d85fb9  100%  [=========================]
        	2183403  100%  [=========================]
        	47f8309  100%  [=========================]
        	10cb5b8  100%  [=========================]
        	163462e  100%  [=========================]
        	4484946  100%  [=========================]
        	d44138e  100%  [=========================]
        	14d414e  100%  [=========================]
        	ff1329b  100%  [=========================]
        	047ee53  100%  [=========================]
        	8426cf4  100%  [=========================]
        	4f4fb70  100%  [=========================]
        Image loaded: hub.foundries.io/advent2025/arduino-led-webui@sha256:8e71ead7eebc75aff4
        Already exists: hub.foundries.io/advent2025/arduino-led-webui@sha256:8e71ead7eebc75aff4
      Done
[6/6] Starting ...
	starting arduino-led-webui --> hub.foundries.io/advent2025/arduino-led-webui@sha256:d5404ecc3861c90251 ... done
      Done
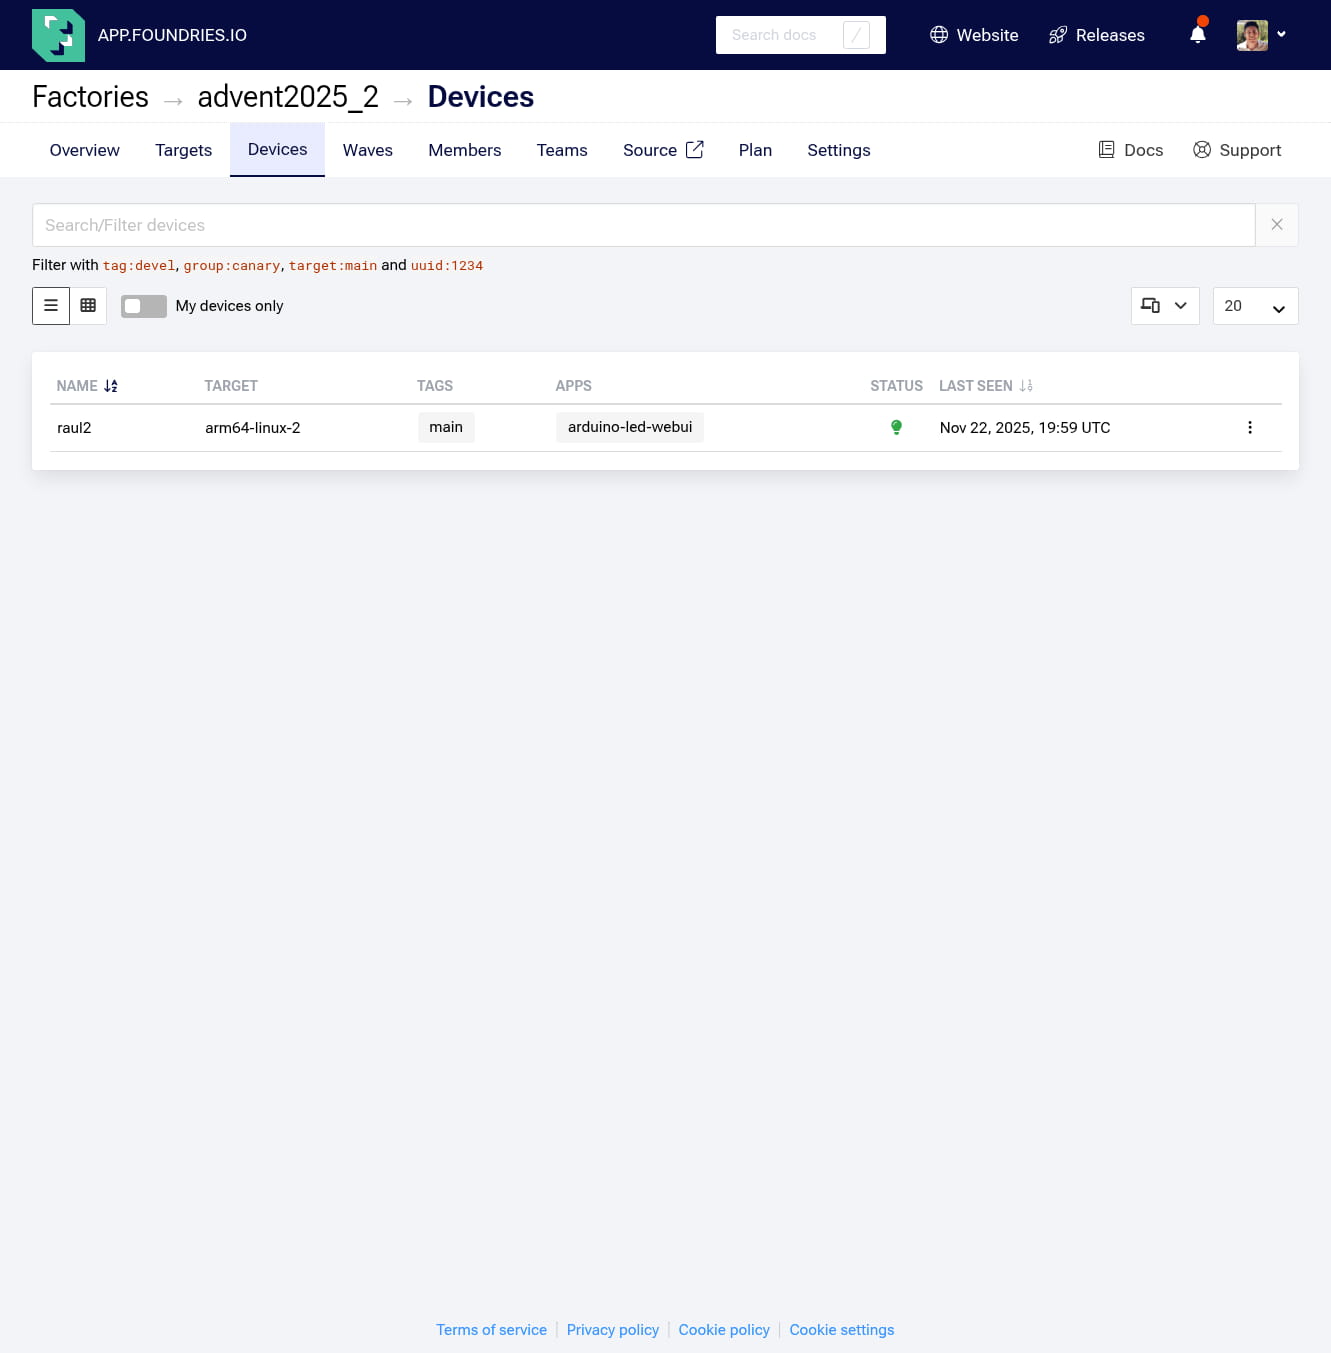
You can also see your device online on FoundriesFactory and what application it is running on: Visit https://app.foundries.io/factories/\<Factory-Name>/devices/
Step 6: Testing the Result
Once fioup reports "Done," your application is running.
1. Verify the Container is Running:
Check the device logs to ensure the container started successfully:
device:~$ docker ps -a
You should see arduino-led-webui with the status Up.
- - - - Output Example - - -
CONTAINER ID   IMAGE                                           COMMAND           CREATED          STATUS          PORTS     NAMES
afa73bfb63a6   hub.foundries.io/advent2025/arduino-led-webui   "/app/start.sh"   47 seconds ago   Up 45 seconds             arduino-led-webui-arduino-led-webui-1
2. Access the Web Interface:
You can access the web interface on any computer on the same network as your Arduino UNO Q. Simply open your browser and navigate to http://<device-IP>:8000
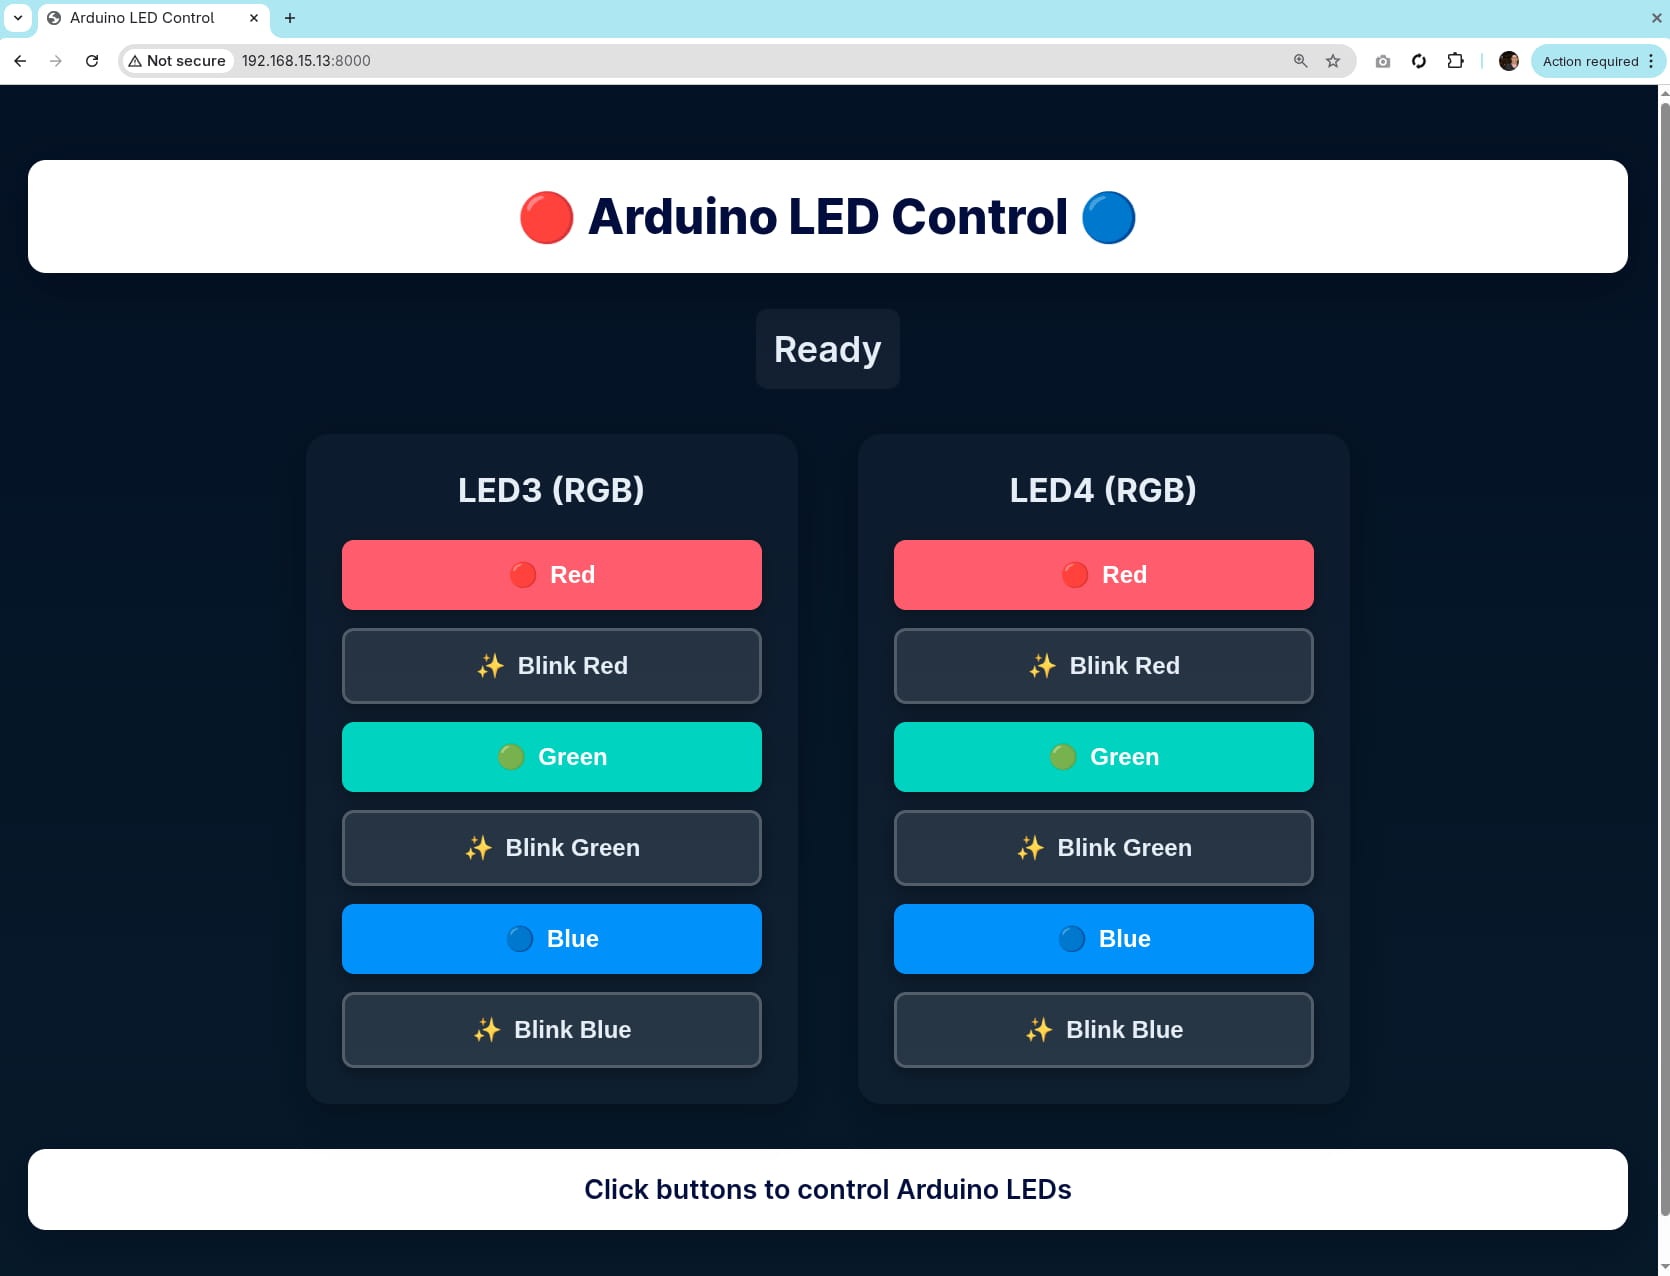
- Click the buttons on the interface.
If successful, the LED on your Arduino UNO Q will blink!
You have just triggered a hardware interrupt on a microcontroller via a web request processed by a Linux container deployed entirely via the cloud.
Step 7: Automating Fleet Management
To prepare for the next demonstration, we will switch from manual updates to automatic fleet management. We will also use the cloud dashboard to remove the current application, returning the device to a clean slate.
1. Update the Factory Configuration
First, we tell the platform that we no longer want this application running on our device.
Navigate to your Devices page:
https://app.foundries.io/factories/<FACTORY-NAME>/devices/.Select your device from the list.
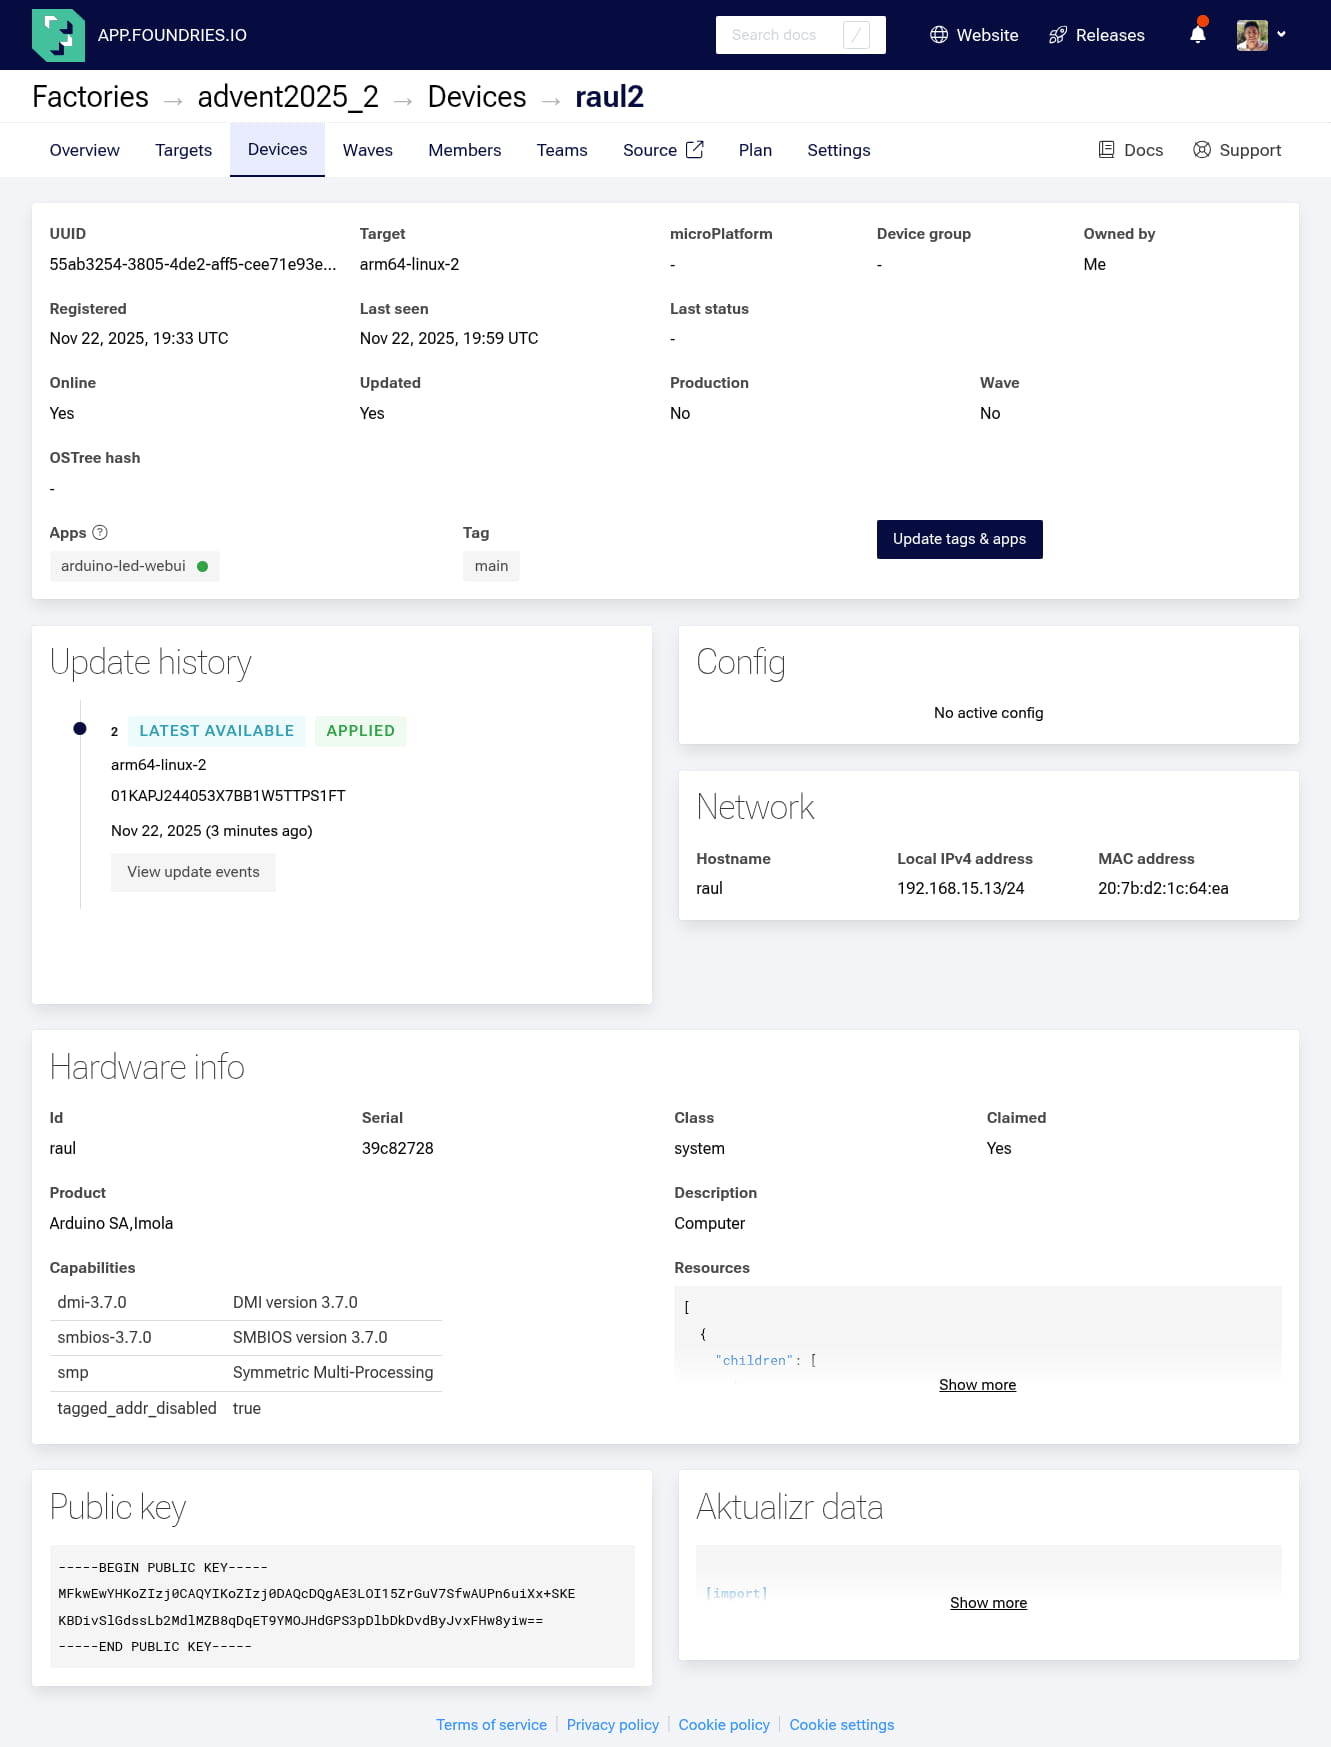
Click Update tags & apps
Remove the App: Move
arduino-led-webuifrom the right (Selected) list back to the left (Available) list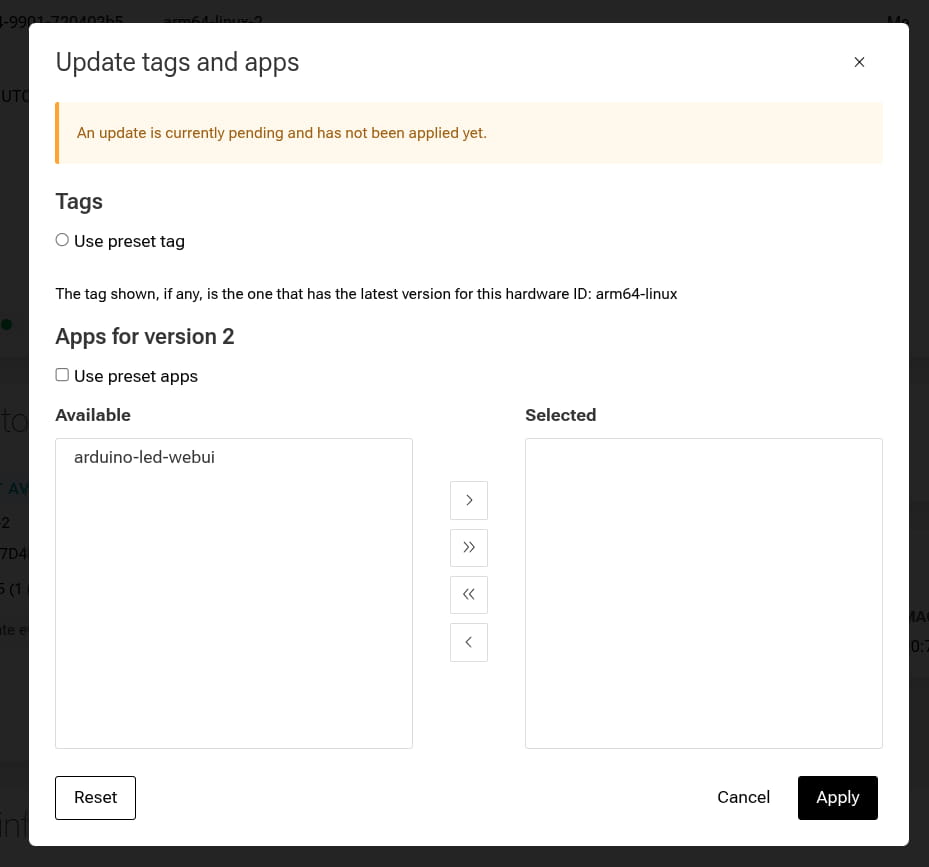
Click Apply
2. Configure the fioup Daemon
Currently, the update is pending in the cloud because our device agent (fioup) is not running in automatic mode. We need to enable it.
To make the device check for updates frequently (for demo purposes), we will first set the polling interval to 20 seconds.
Connect to the device’s terminal and run:
device:~$ sudo sed -i '/\[uptane\]/a polling_seconds = "20"' /var/sota/sota.toml
Now enable and start the fioup daemon
device:~$ sudo systemctl enable fioup
device:~$ sudo systemctl start fioup
3. Watch the Update in Real-Time
Now that the daemon is active, it will automatically detect the configuration change we made in Step 1. Follow the logs to watch it, remove the application:
device:~$ journalctl -f -u fioup
You will see the agent initialize, detect the removal, and stop the container:
[2/6] Initializing ... remove: [arduino-led-webui]
...
[6/6] Starting ... Done
4. Verify Cleanup Finally, confirm that the container is no longer running on the device:
device:~$ docker ps -a
CONTAINER ID   IMAGE     COMMAND   CREATED   STATUS    PORTS     NAMES
Your device is now ready to automatically pull whatever we build next.
Conclusion
In this part, we shifted our workflow from local hacking to Cloud CI/CD.
By configuring the fioup daemon, you now have a powerful Docker Container manager running directly on your Arduino UNO Q. This setup enables you to continuously build, integrate, and deliver containerized applications using FoundriesFactory. Instead of manually transferring files or flashing boards one by one, you simply push code to your repository, and the platform handles the orchestration, building, and secure delivery to your device.
In Part 2 of this series, we will utilize this fleet management capability to deploy a more sophisticated application: an Interactive LED Matrix Controller.
Resources
For a deeper dive, explore the repository to gain a better understanding of the code: