

Replace <factory> with your Factory name.
Welcome to part twelve of our AI Powered Christmas Tree Series! The goal of this series is to serve as a guide for you to build your own AI powered Machine Learning Christmas Tree, thanks to the Arduino Portenta X8 SoM and Edge Impulse AI Platform.
In this tutorial, you will be creating a Docker Compose application and enabling it using the FoundriesFactory® command line interface (Fioctl®). This means that your embedded device will automatically download and run your application as soon as it is powered on.
Before jumping into this entry, be sure to check out the previous blog entries. You can find a summary of each tutorial, and a sneak peek of what’s coming next on our project overview page.
Productizing the AI Powered Christmas Tree
Everything that has been covered in our tutorials until now has resulted in a functional, AI powered, Christmas Tree. It is a solid prototype which does exactly what we have set out to do. However, it has some significant flaws:
- It still must be manually activated
- It is not yet easily reproducible, and in fact requires significant setup on the device
- It is not easily updatable
The goal of this series, beyond just guiding you through making your own AI powered Christmas Tree, is to demonstrate the practical skills needed to make ‘real world’ products, not just projects. Part of that is designing a complete package which overcomes the weaknesses outlined above. All of this can be done with FoundriesFactory!
In this tutorial, you will recreate the christmas-tree.py application and the Dockerfile needed to run the container, and package them both together as a Docker Compose app. The FoundriesFactory CI/CD system can then take this artifact and deliver it to any device registered to your Factory via an over-the-air (OTA) update. Working with your Factory will make it easier than ever to manage or update the entire system.
Prerequisites
This is part twelve of our AI Powered Christmas Tree Series. Please ensure you’ve completed the earlier parts before continuing. You will also need:
- FoundriesFactory
- Fioctl installed and setup on your machine
Using Edge Impulse AI CLI Container
In the previous tutorial, you used the Edge Impulse CLI container to download the modelfile.eim file to write your Python application. This model allows the application to start classifying what you have trained it for, completely offline. You need that same model file to create your Docker Compose application.
When running the Docker image on the device, there is a shared folder between the container and your embedded device. As shown in the docker run command below, you can use this shared folder to copy the model from the device to your host computer:
device:~$ docker run -it \
           --network=host \
           --device-cgroup-rule='c 81:* rmw' \
           -v /dev/video0:/dev/video0 \
           -v /run/udev/:/run/udev/ \
           -v /var/rootdirs/home/fio/image/:/image/ \
           edge-impulse
Refer back to Using AI to Recognize Presence With Edge Impulse for instructions on getting the Edge Impulse Container running on your embedded device if you need to.
With the container running, download and compile the model file to your device:
device-docker:~$ edge-impulse-linux-runner --download modelfile.eim
Now move modelfile.eim to the shared image folder:
device-docker:~$ mv modelfile.eim /image/
Exit the container, or use a second terminal on your device to navigate to the shared folder:
device:~$ cd /var/rootdirs/home/fio/image/
Use scp to copy the model to your host computer using your computer’s user and IP.
device:~$ scp modelfile.eim <user>@<computer-IP>:~
It will then ask for your host computer’s password before copying the model to your home directory.
Docker Compose Application
Now that you have the modelfile.eim on your host computer, you can include it in your container.git. This will allow you to use FoundriesFactory’s CI/CD cloud systems to build your compose app and manage it on your embedded device.
Navigate to your containers directory, or clone containers.git from source.foundries.io if you have not done so already:
host:~$ git clone https://source.foundries.io/factories/<factory>/containers.git
If you have not made any personal modifications, it should look like this:
containers/
├── README.md
├── shellhttpd
└── shellhttpd.disabled
    ├── docker-build.conf
    ├── docker-compose.yml
    ├── Dockerfile
    └── httpd.sh
shellhttpd is a demonstration app to illustrate containers on LmP; if you've worked with Docker before, the structure should be familiar to you.
Within this directory, you are going to create a christmas-tree app. Create a folder named christmas-tree, and copy the modelfile.eim into it:
host:~$ mkdir christmas-tree
host:~$ cd christmas-tree
host:~$ cp ~/modelfile.eim .
You also need to recreate the following files: christmas-tree.py, Dockerfile, and docker-compose.yml:
host:~$ vim christmas-tree.py

#!/usr/bin/env python

import cv2
import os
import sys, getopt
import signal
import time
import random
from edge_impulse_linux.image import ImageImpulseRunner
from paho.mqtt import client as mqtt_client


broker = '192.168.15.97'
port = 1883
topic = "cmnd/switch/POWER1"
# Generate a Client ID with the subscribe prefix.
client_id = f'subscribe-{random.randint(0, 100)}'
# username = 'emqx'
# password = 'public'

runner = None

def publish(client, msg):
    result = client.publish(topic, msg)
    status = result[0]
    if status == 0:
        print(f"Send `{msg}` to topic `{topic}`")
    else:
        print(f"Failed to send message to topic {topic}")

def connect_mqtt() -> mqtt_client:
    def on_connect(client, userdata, flags, rc):
        if rc == 0:
            print("Connected to MQTT Broker!")
        else:
            print("Failed to connect, return code %d\n", rc)

    client = mqtt_client.Client(client_id)
    # client.username_pw_set(username, password)
    client.on_connect = on_connect
    client.connect(broker, port, 2)
    return client

def now():
    return round(time.time() * 1000)

def get_webcams():
    port_ids = []
    for port in range(5):
        print("Looking for a camera in port %s:" %port)
        camera = cv2.VideoCapture(port)
        if camera.isOpened():
            ret = camera.read()[0]
            if ret:
                backendName =camera.getBackendName()
                w = camera.get(3)
                h = camera.get(4)
                print("Camera %s (%s x %s) found in port %s " %(backendName,h,w, port))
                port_ids.append(port)
            camera.release()
    return port_ids

def sigint_handler(sig, frame):
    print('Interrupted, stopping the program')
    if runner:
        runner.stop()
    sys.exit(0)

signal.signal(signal.SIGINT, sigint_handler)

def help():
    print('python classify.py <path_to_model.eim> <Camera port ID, only required when more than 1 camera is present>')

def main(argv):
    try:
        opts, args = getopt.getopt(argv, "h", ["--help"])
    except getopt.GetoptError:
        help()
        sys.exit(2)

    for opt, arg in opts:
        if opt in ('-h', '--help'):
            help()
            sys.exit()

    if len(args) == 0:
        help()
        sys.exit(2)

    model = args[0]

    dir_path = os.path.dirname(os.path.realpath(__file__))
    modelfile = os.path.join(dir_path, model)

    print('MODEL: ' + modelfile)

    with ImageImpulseRunner(modelfile) as runner:
        try:
            model_info = runner.init()
            print('Loaded runner for "' + model_info['project']['owner'] + ' / ' + model_info['project']['name'] + '"')
            labels = model_info['model_parameters']['labels']
            if len(args)>= 2:
                videoCaptureDeviceId = int(args[1])
            else:
                port_ids = get_webcams()
                if len(port_ids) == 0:
                    raise Exception('Cannot find any webcams')
                if len(args)<= 1 and len(port_ids)> 1:
                    raise Exception("Multiple cameras found. Add the camera port ID as a second argument to use to this script")
                videoCaptureDeviceId = int(port_ids[0])

            client = connect_mqtt()
            camera = cv2.VideoCapture(videoCaptureDeviceId)
            camera.set(cv2.CAP_PROP_FPS, 1)
            fps = int(camera.get(5))
            print("Initializing camera at port %s, FPS %d" % (videoCaptureDeviceId, fps))
            ret = camera.read()[0]
            if ret:
                backendName = camera.getBackendName()
                w = camera.get(3)
                h = camera.get(4)
                print("Camera %s (%s x %s) in port %s selected." %(backendName,h,w, videoCaptureDeviceId))
                camera.release()
            else:
                raise Exception("Couldn't initialize selected camera.")

            next_frame = 0
            christmas_tree_on = False
            turn_off_christmas_tree(client)
            person_detection_count = 0
            last_detection_time = 0

            next_frame = 0 # limit to ~10 fps here

            for res, img in runner.classifier(videoCaptureDeviceId):
                if (next_frame > now()):
                    time.sleep((next_frame - now()) / 1000)

                if "bounding_boxes" in res["result"].keys():
                    person_detected = any(bb['label'] == 'people' and bb['value'] > 0.8 for bb in res["result"]["bounding_boxes"])

                    if person_detected:
                        last_detection_time = now()
                        person_detection_count += 1

                    print('Current person detection count:', person_detection_count)
                    if person_detection_count >= 2 and not christmas_tree_on:
                        print('Two or more people detected')
                        christmas_tree_on = True
                        turn_on_christmas_tree(client)
                        person_detection_count = 0

                    if christmas_tree_on and now() - last_detection_time >= 3000:
                        print('Turning off Christmas tree after 3 seconds of last detection')
                        christmas_tree_on = False
                        turn_off_christmas_tree(client)
                        person_detection_count = 0

                next_frame = now() + 50
        finally:
            if (runner):
                print('Stopping runner')
                runner.stop()

def turn_on_christmas_tree(client):
    client = connect_mqtt()
    publish(client, 'ON')
    print('Christmas tree turned on')

def turn_off_christmas_tree(client):
    client = connect_mqtt()
    publish(client, 'OFF')
    print('Christmas tree turned off')

if __name__ == "__main__":
   main(sys.argv[1:])
host:~$ vim Dockerfile

FROM debian:bullseye-slim
ENV DEBIAN_FRONTEND=noninteractive

RUN apt-get update -y && \
    apt-get install -y --no-install-recommends \
    fswebcam \
    v4l-utils \
    wget \
    ca-certificates

RUN wget https://deb.nodesource.com/setup_12.x
RUN bash setup_12.x

RUN apt-get update -y && \
    apt-get install -y --no-install-recommends \
    gcc \
    g++ \
    make \
    build-essential \
    nodejs \
    sox \
    gstreamer1.0-tools \
    gstreamer1.0-plugins-good \
    gstreamer1.0-plugins-base \
    gstreamer1.0-plugins-base-apps \
    vim \
    v4l-utils \
    usbutils \
    udev \
    git \
    libatlas-base-dev \
    libportaudio2 \
    libportaudiocpp0 \
    portaudio19-dev \
    ffmpeg \
    libsm6 \
    libxext6 \
    python3-pip \
    python3-dev \
    python3-pyaudio

RUN pip3 install edge_impulse_linux -i https://pypi.python.org/simple
RUN pip3 install opencv-python six paho-mqtt

RUN npm config set user root
RUN npm install edge-impulse-linux -g --unsafe-perm

WORKDIR /
COPY christmas-tree.py /
COPY modelfile.eim /
host:~$ vim docker-compose.yml

version: '3.2'

services:
  christmas-tree:
    image: hub.foundries.io/${FACTORY}/christmas-tree:latest
    restart: always
    tty: true
    network_mode: "host"
    entrypoint: [ "/usr/bin/python3" ]
    command: [ "christmas-tree.py", "modelfile.eim" ]
    volumes:
      - /run/udev/:/run/udev/
      - /dev/:/dev/
    device_cgroup_rules:
      - 'c 81:* rmw'
With the files in place, commit your changes and push:
host:~$ cd .. # back to containers
host:~$ git add christmas-tree/
host:~$ git commit -m "Adding christmas-tree App"
host:~$ git push


Enumerating objects: 8, done.
Counting objects: 100% (8/8), done.
Delta compression using up to 16 threads
Compressing objects: 100% (7/7), done.
Writing objects: 100% (7/7), 12.74 MiB | 2.64 MiB/s, done.
Total 7 (delta 0), reused 0 (delta 0), pack-reused 0
remote: Trigger CI job...
remote: CI job started: https://app.foundries.io/factories/<factory>/targets/6/
To https://source.foundries.io/factories/<factory>/containers.git
   4f41090..02d9c88  main -> main
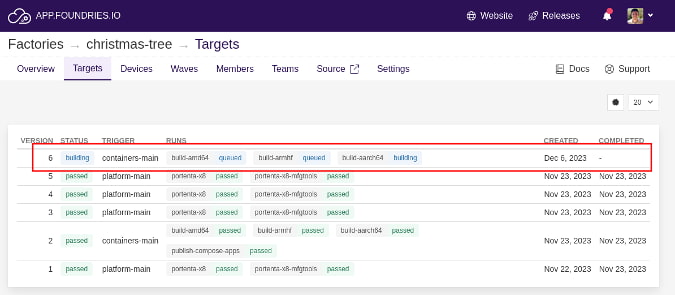
This will launch the CI build for your Factory’s containers. You may follow your build on app.foundries.io on the Target page:
If you have not already done so, register your device to the Factory.
Using Fioctl to Configure Your Device
By default, a device will run all apps associated with the latest Target which it upgrades to. Creating a new Target like we have just done will trigger this upgrade. This behavior can be changed by enabling only specific applications. Read Enabling/Disabling Apps to learn how. Briefly, if you wish to enable only your christmas-tree app on the device, run:
host:~$ fioctl devices config updates --apps christmas-tree <device-name> -f <factory>

Changing apps from: [] -> [christmas-tree]
At this time, the aktualizr-lite daemon on your device will recognize the available update and begin downloading and applying it. On your device, you may follow the update logs with:
device:~$ sudo journalctl -f -u aktualizr-lite
Once the update is complete, you will be able to view the status of your device and its associated app on the Devices tab on your Factory page on app.foundries.io.
Testing Your AI Powered Christmas Tree
When the device finishes the over-the-air update, the application will automatically launch.
Check if the Docker Compose app is already running with the command below:
device:~$ docker ps
Output will show the app name:
CONTAINER ID   IMAGE                                            COMMAND                  CREATED          STATUS         PORTS     NAMES
f6011e3790a7   hub.foundries.io/christmas-tree/christmas-tree   "/usr/bin/python3 ch…"   22 minutes ago   Up 8 minutes             christmas-tree-christmas-tree-1
You can now debug your application by following the container log:
device:~$ docker logs -f christmas-tree-christmas-tree-1
The logs will show the Python code output. If any people are detected in view of the camera and the switch module is correctly connected to the MQTT broker running on your device, it will turn on and off the Christmas Tree lights!
This is an example output of the christmas-tree app running on the embedded device:
Initializing camera at port 1, FPS 5
Camera V4L2 (480.0 x 640.0) in port 1 selected.
Send `OFF` to topic `cmnd/switch/POWER1`
Christmas tree turned off
Current person detection count: 0
Current person detection count: 0
Current person detection count: 0
Current person detection count: 1
Current person detection count: 2
Two or more people detected
Send `ON` to topic `cmnd/switch/POWER1`
Christmas tree turned on
Current person detection count: 1
Current person detection count: 2
Current person detection count: 3
Current person detection count: 4
Current person detection count: 5
Current person detection count: 6
Current person detection count: 7
Current person detection count: 8
Current person detection count: 8
Current person detection count: 9
Turning off Christmas tree after 3 seconds of last detection
Send `OFF` to topic `cmnd/switch/POWER1`
Christmas tree turned off
Current person detection count: 0
Current person detection count: 0
Current person detection count: 1
Current person detection count: 2
Two or more people detected
Send `ON` to topic `cmnd/switch/POWER1`
Christmas tree turned on
Current person detection count: 1
Current person detection count: 2
Current person detection count: 2
Current person detection count: 3
Current person detection count: 3
Current person detection count: 4
Turning off Christmas tree after 3 seconds of last detection
Send `OFF` to topic `cmnd/switch/POWER1`
Christmas tree turned off
Current person detection count: 0
Current person detection count: 0
...
Recap and Conclusion
In this tutorial, you have created your christmas-tree Docker Compose application. Your AI powered Christmas Tree is now much closer to being a real product! From this point forward, you can have all the necessary components of the system up and operating on any device—registered to your Factory—in minutes. You are also capable of making any number of modifications to the christmas-tree Docker Compose application, or even the Linux microPlatform™ (LmP), and the FoundriesFactory CI/CD will automatically rebuild everything then update your device. This is the beauty of having a CI/CD designed for embedded system development. It certainly accelerates your development process.
We hope you have enjoyed our AI powered Christmas Tree series, and that we have been able to introduce you to some of the important concepts in modern embedded development. But we’re not quite finished yet!
Join us in the next part as we showcase the flexibility of FoundriesFactory, recreating the entire AI powered Christmas Tree on a Raspberry Pi!
Continue Building Ai-Powered Christmas Tree
If you are interested in our entire 14-part series on how to build an AI powdered Christmas tree, browse through each section below. Each part brings you closer to mastering your build:
- Part 1: Your First FoundriesFactory AI-Powered Christmas Tree
- Part 2: Configure Network and Wi-Fi
- Part 3: A Yocto & Linux Tutorial for Building An AI-Powered Christmas Tree
- Part 4: Linux MicroPlatform (lmP) Config Tutorial for AI-Powered Christmas Tree
- Part 5: Modify & Extend Linux MicroPlatform for AI-Powered Christmas Tree
- Part 6: Using a MQTT Switch Module on Arduino Portenta X8
- Part 7: Creating a Shell Script Application and Adding to Linux microPlatform™ (MQTT)
- Part 8: Connecting the Web Camera Interface with Docker Container
- Part 9: Using Edge Impulse AI to Recognize Human Presence With Arduino Portenta X8
- Part 10: Enhancing the Image Detection Capabilities of our AI Powered Christmas Tree
- Part 11: Writing a Python App to Turn Our Christmas Tree On/Off Using AI
- Part 12: Creating a Docker Compose App to Automatically Power Your AI Christmas Tree On/Off
- Part 13: Running Docker Compose Application on a Raspberry Pi 4 to Power Our AI Christmas Tree
- Part 14: Managing Multiple SoM Platforms in the Same Factory